same source, unlike potatoes and they also do not have different varieties. Also
they come in very small pieces of equal size. This makes it easy to measure
the mass accurately. This also makes sure the surface area is the same. The
variables we will have in the real experiment will stay the same. We will
still measure the oxygen (O2) given off, however by using a gas syringe rather
than attempting to measure the height of constantly changing bubbles. We will
change the temperature in the new experiment. We generate the heat by placing
the bottles of H2O2 in separate water baths. Originally we foolishly measure only
3 temperatures due to the lack of time: 0, 20 and 80°C. We shall use the
temperatures: 0, 20, 40, 60, 80°C to get a range of results to help determine the
optimum temperature with greater accuracy.
We will control the following in order to have a fair test: weight of yeast because
this could affect the rate of reaction (more will give a higher rate of reaction
while less will give a lower rate); the time that we take to allow the
reaction to happen. This will produce fairer and clearer results. We shall
also keep the pH the same by using buffers to stop extreme pHs. This is
important due to the fact that if we increase the optimum pH then the
enzymes will become denatured and the shape of the active sites will change, stopping them from reacting any more (I explain this in lots of detail further on). I will also keep the concentration of H2O2 the same as too high or low causes enzyme denaturing.
I predict that the central temperatures such as room temperature shall
have highest rate of reaction because there is only a small possibility of
enzyme denaturing.
Chapter 2 – Method
The following lines illustrate our method. They are separated into easy-to-understand steps.
Step 1: Attach a clamp to a stand.
Step 2: Set up a gas syringe by attaching it to the clamp. Make sure that this
is gripped tightly, however make certain that it does not restrict movement of
the inner component.
Step 3: Weigh out 0.1g of dried yeast and place this into a conical flask.
Step 4: Insert 5cm3 of buffer (to change the pH to neutral) into the conical
flask. You can change the temperature to any desired one. Leave it till it
has equilibrated (returned to average pH).
Step 5: Add 25cm3 Hydrogen peroxide (H2O2).
Step 6: Shake the mixture in the conical flask 6 times.
Step 7: Quickly place the bong from one end of the delivery tube into the neck of
the conical flask to prevent crucial oxygen from escaping.
Step 8: For every 10 seconds, make a measurement from the gas syringe.
Step 9: Repeat the process. However for the temperatures that require altering
the temperature, place the bottle of Hydrogen Peroxide into the needed water baths.
Chapter 3 – Equipment
Here is a list of the equipment we used in our experiment:
-
Measuring Tube: This shall aid us in measuring the H2O2 that we add to yeast.
- Conical flask: the neck allows the bong to fit perfectly without losing any gas given off, although some may be if we do not act quick enough.
- Water bath: Water sustains heat more, so it is more efficient and helps maintain the needed temperature without losing heat. However the time spent walking towards the experiment will cause heat loss.
-
Gas Syringe: This allows for more accurate reading of the O2 given off. Some gas syringes may however get stuck.
- Clamp: Holds the gas syringe. Too tight could cause it to break.
- Clamp Stand: Holds the clamp in place.
Chapter 4 – Results Tables
OS: Off Scale
1. Volume of Oxygen (cm3) at each interval (s)
2.
3.
OS – Off Scale
Chapter 6 – Rate of Reactions with averages
Rate of reaction (cm3/s)
Outlier:
Conclusion
From my results graph, one thing is obvious: when you increase the temperature,
the rate of reaction increases until you get to 40°C onwards. I found that at
0°C the average rate of reaction was 0.3cm3/s. However at 40°C, it was 1.67cm3/s,
but then at 60°C it dropped to 0.9cm3/s.
The optimum temperature was 40°C with the rate of reaction and its highest
(1.67cm3/s), but above this point it fell rapidly.
Regrettably, I cannot be very confident with my results and my optimum
Temperature because they may not be accurate. Our results contained three
outliers that would affect the error bars. These error bars overlap at 20°C and
40°C. Therefore I am unable to give a confident and accurate optimum
temperature. Had we repeated the experiment more times we would get more
reliable results.
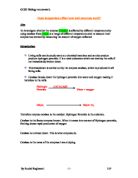
The answer to how this works lies in the enzymes that cause the reaction.
Each enzyme possesses an active site. This is unique, and only a few substrates
can fit into it. If a substrate does, then a reaction occurs, and following this
the substrate leaves the active site, allowing for another reaction. If you increase
the temperature, the enzymes and substrates move around faster, so it is more
likely for them to collide, and fit into each other, causing a reaction. At a low
temperature, reaction times will be longer, while higher and they will be
shorter. However if it is too hot, the enzyme will denature, or lose its shape. If this
happens then the reaction will not take place as the substrate must fit perfectly
into the active site. The following diagram illustrates what happened in our
reaction:
Evaluation
My results are mostly variable because my error bars at 20, 40 and 80°C are very
large. There are a number of possibilities as to why our results may have varied.
One reason is some equipment may not have been cleaned properly, and as a
Result the experiment was affected by a previous one. Another possibility is we
had no control over room temperature, so some solutions may have been warmer
than intended, or colder.
We also cannot be certain that my results are accurate. The gas syringe moved
very quickly, so making a precise reading was a very difficult task. Plus as soon as
we removed the hydrogen peroxide from the water bath it began cooling, so
temperatures would vary. Once we had added the hydrogen peroxide to yeast,
the reaction began almost immediately, so we may have lost some crucial oxygen
that may have affected our error bars. We may have accidently shaken one test
more than the others. Another problem is how our apparatus may not have been
100% accurate. As I explained earlier my error bars varied a lot, and this
may have been a result of anything I have previously mentioned.
Our results had 3 outliers that were all too high. These were at 80, 60 and 0°C.
This may have been that with the other set of results we repeatedly made errors,
or we read the gas syringe wrong for the results with outliers.
Our results, as I said before may not have been particularly accurate. The error
margins that may have been present in our experiment was +/-0.5cm3. If we take
the results for 60°C (0.9cm3/s), then we can do the following:
0.5 X 100 = 55.55%
0.9
Unfortunately I am not perfectly confident with my results as a due course of the
varying error bar size, and possible faults in our method.
Next time I perform the experiment, I will do the following:
- Do more than 3 experiments to get a more accurate average. I believe that a reasonable amount of repeats would be 5 times. Outliers would then have a smaller effect on our results.
- Thoroughly clean the apparatus to stop possible problems as results of
previous experiments. We could do this by using water to clean out certain apparatus (e.g. measuring cylinder or conical flask)
- Vary the temperatures more. I could experiment with using sub-zero temperatures to see just how much of an effect they may have on our results.
- Use different concentrations of hydrogen peroxide for the same reasons as above.