To Briefly Summarise
Increase in surface area
Increase in number of enzymes found on surface
Increase in active sites available
Increase in number of effective collisions
Increase in H O molecules broken down
Increase in products produced
Increase in volume of oxygen released
Simple model of active site of an enzyme (figure 1)
*Substrate (H O ) fits into the active site. Substrate has to fit into the active site so it can collide with the enzyme.
To keep all other variables constant so they do not influence my results, I will do all experiments in the same room, checking the temperature before and throughout the experiment using a thermometer or simply placing the test tubes in a water bath at a constant temperature. This will make sure that it is a fair test. Because if the temperature is high the reactant molecules will gain energy, abling them to move faster and move into and out of the active sites quicker. Resulting in an increase of effective collisions, so amount of oxygen produced will increase. Also, if the increase in temperature is very high , the protein structure of the enzyme will be affected. The protein molecule is a long folded chain. As the temperature is increased the folded chain jostles and reforms and so the shape of the active site changes. This change unables the right shape and size of a chemical molecule to be able to fit in and collide. But if the temperature is too high, above a certain temperature (optimum) the active site has changed so much that it is no longer able to trap reactant molecules and collide. Such an enzyme is said to be denatured.
But on the other hand, if the temperature is below the constant,the molecules will have decreased energy, slowing them down, so they will move into active sites slower, causing fewer effective collisions.
Another variable that I must keep constant is the concentration of hydrogen peroxide. This will ensure that my experiment will be fair. Naturally, the kinetic energy of the molecules would be higher when heated up and so if there is a higher concentration, although the temperature stays the same there will be a higher chance of more successful collisions because there will be more molecules present so there will be a higher chance of a hydrogen peroxide molecule entering the active site and colliding. So the overall reaction will occur faster.
The time left for the hydrogen peroxide molecules to collide with the enzymes will also be a major variable that I will need to keep constant. Because the longer the length of time, the more reactant molecules will have time to collide, so there will be more successful collisions. Whereas if the time length is decreased, less hydrogen peroxide molecules will enter the active sites and collide, resulting in less collisions and a decrease in the volume of oxygen produced.
Enzymes are sensitive to pH. An enzyme is specific, we know this from our background information, this means that only the right shape and size will be to fit in and be able to let the enzyme help with the reaction, collide. Inside cells, most enzymes work best in neutral conditions around pH 7. However, the enzymes in our stomach work best in acidic conditions. So if the pH changes the enzyme’s active site changes shape, reforms, meaning that the substrate (H O ) is unable to fit and collide. As a result, the enzyme will cease to function as a catalyst. So breakdown of H O will not occur. To ensure a fair test all experiment will be conducted using the same pH of hydrogen peroxide.
I will need a variety of equipment in order to do an accurate experiment. Below is a list of the equipment I will need:
-stop clock (timer) -ruler -balance (to measure mass)
-Scalpel -potato borer -2 clamp stands
-PH probe -goggles -delivery tube
-Beaker -thermometer - pen and paper to record results
-Disposable gloves -bung - 2 bottles of H O solution.
-1 tube rack -elastic band -burette
-1 ceramic tile -measuring cylinder
-5 x 12cm potato cylinders each from (5 whole potatoes)
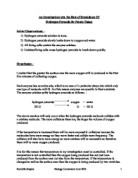
Diagram to show my Equipment Set-Out (figure 2)
To ensure full safety of this experiment I have to make sure that the cork borer and scalpel are used on a tile and not on my hand when cutting the potato cylinders. Hydrogen peroxide is very corrosive so if any of it is spilt onto any area of my skin I must wash that area immediately. I will also have to wear eye protection (goggles) because any contact with the eye can cause serious damage. I have to remove all bags and blazers that could get in my way or cause an accident. When doing the experiment I have to make sure my eyes are fixated on the equipment to avoid spillage and tie my hair back so that it does not get in my way.
I will be using pureed potato to provide the enzymes for this experiment. This type of potato is better than using whole potatoes as it provides a larger surface area and this means more active sites for the substrate to react with. Before I begin each experiment I will cut a cylinder of 12cm from a new potato, using a potato borer and then a ruler and scalpel to measure and cut. I will only cut a 12cm cylinder of potato just before each experiment because in my trial experiment I could see that the cylinders were starting to dry, as they were exposed to air quickly.
To get clear results, and accurate conclusions from the experiment I feel that at least the 12cm cylinder should be cut up into 5 different pieces;
1st experiment:
12 x 1: the 12 cm cylinder will not be cut up.
2nd experiment:
6 x 2: the 12cm cylinder will be cut up in ½, each new cylinder measuring 6cm.
3rd experiment:
4 x 3: the 12cm cylinder will be cut up in 3 equal pieces, each new cylinder measuring 4cm.
4th experiment:
3 x 4: the 12cm cylinder will be cut up in 4 equal pieces, each new cylinder measuring 3cm.
5th experiment:
2 x 6: the 12cm cylinder will be cut up in 6 equal pieces, each new cylinder measuring 2cm.
*At the beginning 120mm of potato cylinder will be measured.
*The radius of the cylinder each time will be 7.3mm
*In my trial experiment I began with 10cm of potato cylinders but when I came to cutting it up into small pieces I found it tricky, for example, in ½ of 10cm each new cylinder measured 5cm whereas in my plan I decided to use 12cm, each new cylinder measured 6cm, I made the length larger as more reliable results could be gained. My results for my trial experiment included; 10cm x 1 potato cylinder produced 4.4cm of oxygen,5cm x 2 potato cylinder produced 7.2cm,2cm x 5 potato cylinder produced 12.5cm. Of course these were very unreliable results but as a trial experiment I could see that I needed to increase the largest length from 10cm to 12cm.
*I also worked out the surface area (mm ) for each experiment above. These are the measurements I am going to use for my actual experiment. By this I can see how the surface area increases as I cut up the 120cm of potato cylinder into smaller pieces.
Table to show calculation of surface area in mm
To begin with I will set up my equipment as shown above and place the 6 pureed potatoes near the ceramic tile, ready for being cut. To collect the results I will be measuring the volume of oxygen produced from the reaction, by letting it pass through the delivery tube and let it displace the water in the burette, which starts at 10ml . I will have a test tube rack near me where 5 test tubes will be kept. I will fill the beaker with 150cm of water and also measure the temperature of the water and room using a thermometer, and also again before each test. The water in the beaker is important because when I turn the burette upside down after I have filled it up, the water ensures no water in the burette is lost, by causing pressure. I will fill the measuring cylinder up to 40ml of hydrogen peroxide solution, which is concentrated 1.2M and then pour the measured solution into the test tube
I will stabilise the test tube and burette using a clamp stand. I will then use a pH probe to make sure that the pH of the solution remains the same (repeating this procedure before placing the potato cylinder). Whilst doing my trial experiment I used 20 ml of hydrogen peroxide solution but saw that the reaction was slow and the potato cylinders were floating on top so I increased the volume of H O to make sure I had accurate readings. As soon as the H O solution is set I will join the delivery tube to the test tube. I will then straightaway place the cut up cylinder of potato into the solution, making sure I start the stop clock at the same time. Almost immediately I will place the bung on top of the test tube. From the equation at the start I knew that this reaction will produce H O, this will stay in the test tube but the oxygen will pass down the delivery tube and up into the burette as tiny bubbles, which will hopefully displace the water there. I will measure the volume of oxygen in cm evolved in a time of 2 minutes then later on at 4mins, reading the scale on the burette. Making sure I stop the stop clock at the interval and do not reset it. During my trial experiment I decided to just record for 2 minutes but I realised that not enough time was given for collisions to occur, this would lead to unreliable results.
I will repeat all the tests at least three times so that an average can be obtained. Repeating the experiments several times will help to produce better and more accurate results, as any inaccuracies in one experiment should be compensated for by the other experiments. This gives the rate in cm of oxygen produced in the time of 2 and 4 minutes, this is because I am timing how much oxygen gas is given off in the space of 2 and 4 minutes for the various surface areas(mm ).
From these results, a graph can be plotted with surface area(mm ) on the x-axis and the volume of gas(cm ) on the y-axis.