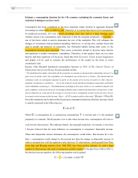
Although a sundial seems like a simple device for measuring time, it is not. One cannot simply look at the shadow and find the time. Firstly the sundial will show local time, not GMT. Secondly we must allow for the ‘equation of time.’ Because the Earth’s orbit is not circular, its velocity changes at the perihelion. To allow for this would be awkward, so we use a ‘mean sun.’ The equation only rises as high as 16 minutes. It is the same every year, and on 4 dates it becomes 0.
A minus sign indicates that the clock is ahead of the sun, a plus that it is behind the sun.
Clock time = (sundial time) – (equation of time)
For example: Sundial time = 10:00am
Date= January 9th
∴ Equation of time= -7
Clock time = (sundial time) – (equation of time)
= 10:00 – (-7)
=10:07am
This is the GMT.
Design Details:
I will make the base of my Sundial out of MDF wood as it a cheap and a relatively durable material, it is also very easy to work with, plus it will be made weatherproof with varnishing. I will use steel sheeting for my style, as it is thin, strong and easy to cut into the required shape. My sundial will be about 20cm x 20cm big. I will need to have a template for the markings on the sundial, such as the one shown below.
This template was made using the following instructions exerted from my GCSE Astronomy text book: “Divide a square into two by the line AB. Select a point, C for the position of the style. Draw the line DCE, at right angles to AB, which will be our 6 o’clock line. Draw CG, making angle ACG equal to your latitude 51°. From F, the top point of intersection of AB with the square (our 12 o’clock point), drop a perpendicular FH on to CG. On AB mark off FJ, making FJ = FH. From J construct angles of 15° each, obtaining the 1 o’clock, 2 o’clock points and so on. When these lines no longer hit the top of the square, draw JK and JL through the corners of the square; K and L will fall along DE. From K and L construct 15° angles as before, so obtaining the rest of the hour lines on the side of the dial. Connect all the hour lines up to point C- and the dial is complete.”
Included is a design of my Sundial:
Testing the Dial.
I managed to successfully test my sundial. My testing took place during the BST, so I had to compensate for this. I pointed the correct line, along the style, North. I then quite simply read the shadow.
As you can expect the times will be slightly different. The difference was consistent to all the tests I did. The exact time can be found more accurately. My testing took place on April the 25th at about 12:05. Because of this date I have to use the equation of time = +2:
Clock time = (sundial time) – (equation of time)
Therefore the time when the sundial reads 11 is (11:00)-(+0:02) or 10:58, but I then have to add the hour difference between the two time zones to obtain an exact sundial time of 11:58.
The testing took place on a Latitude of about 1°30’W. We must times this by 4 to achieve a correction of 6 minutes, which must be added to the sundial time.
This means we achieve a final Sundial time of 12:04.
Evaluation:
Overall I think that the project was a success. My Sundial, whilst not very impressive in appearance, worked successfully. I successfully used the equation of time to achieve an accurate time from my sundial. My sundial would work well all year round, however you would need to add an hour in the summer as well as using the equation of time. If I was to do the project again I think I would spend more time on the Sundial itself, varnishing it and making sure it was completed with more time to spare so I could do further tests. Overall I am pleased with how the project has gone, and I have found it to be relatively successful.
Jonathan Matthews