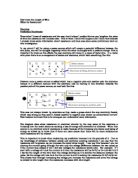
The reason for this is that in the longer piece of wire there are more atoms so more chances of collisions occurring between the atoms and the electrons which decreases the electrons energy so increasing the resistance.
There is also another way in which to determine the resistance and that is by looking at the resistivity of the metal wire and its length and cross- sectional area. This creates the equation:
Resistance = Resistivity * length
Cross sectional area
So by using this equation it is again possible to show that by only altering the length of the metal wire you can change the resistance.
Resistance =
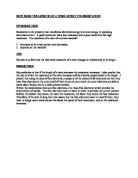
Apparatus
8 metre metal wire
Volt metre
Ammeter
Bulb
Power pack
8 wires
Diagram
Method
Before I start to set up the experiment I have to make sure the thickness of the metal wire is the same so I need to take 14 readings of the thickness at different points along the metal wire.
For this experiment I will connect up the power pack to the ammeter then the ammeter to the end of the 8 metres of metal wire but the first reading has to be taken at the 1 metre point so that I can increase the length from there onwards by 1 metre each time. So at the end of the first metre I will put another piece of wire with a crocodile clip on and clip it to that point and the other end to the power pack. Along that metre where the two ends are connected using crocodile clips I will need to add a wire to each and link them both to the ammeter which will measure the resistance in that length of wire.
After doing the measurement for the first metre of metal wire I need to do the same thing for 2 metres of metal wire, this will allow me to either prove or disprove my theory on resistance alteration due to a piece of wires length. As I complete each metre of wire I have to alter the length my increasing the metal wires length by a metre and then repeat the taking of readings. During the time the power pack is on I will take measurements from the ammeter and volt mater to get my two readings needed to create the resistance.
Since the total length of the metal wire is only 8 metres it would be silly to do any less then 8 results and since I want to be able to make accurate measurements I will only use the 8 metres for my results as it will be easy and accurate to add on 1 metre to each of the previous ones.
To check the reliability of my results I will do repeat, if my second repeat doe not match my first set of results then I will do another set of results and from there I will look to see where I went wrong in either my calculations or set up. To make sure that you can handle the metal wire it is important to turn of the power pack between after taking a result and setting up for the next result. Turning of the power pack also makes sure that the resistance does not build up and make it greater then what it would normally be.
Fair Test
To make this a fair test I will only be altering the length of the metal wire and I will be keeping all other factors the same. Since I only want to see if the length of metal wire effects the amount of resistance I do not need to change any other factors such as current or temperature as these will change the whole out come of my experiment.
If I changed the current going through the wire then that would instantly change the resistance as would any increase in heat. This is because by applying heat to the metal wire you are giving the atoms more kinetic energy so they vibrate more creating a bigger obstacle for the electrons to pass this will mean that there is a higher chance of collisions so more resistance.
Something else that needs to stay the same is the thickness of the metal wire because if there were a change in thickness then I would not get accurate results. This would be because if there was a change in thickness then there might be more or less atoms so either generating more or less resistance.
Obtaining Results
From my repeat I can see that something has gone wrong so I will again do a repeat to see which of my results is correct. Even though they both show my prediction to be correct I need to see if when the current is the same again whether I get the same results or something close.
Now that I have done a further repeat I can draw some conclusions but due to the first set of results being totally anomalous compared to my other results I will only do an average for my second two set of results.
Average
Graph of Averages
Analysing Evidence and Drawing Conclusions
My graph of averages shows a straight line that is constant so shows that as I increase the length of a piece of metal wire the amount of resistance also increases.
From my graph I can see that the experiment does prove my original prediction correct I know that my prediction is correct because from just looking at my graph I can see that the resistance is increasing as the length of the wire is increased and since I did not alter the temperature it is in a straight line.
The resistance increased with the length of wire’s increased length because the power pack has a negative pole and a positive pole so once the power pack is put into the circuit the electrons within the metal wire are instantly attracted towards the positive pole of the power pack so are all moving the same way. When all moving towards the positive pole the electrons will collide with the metal atoms also found within the metal wire. When colliding with these atoms the electrons lose energy and can not move as much so a resistance is created within the metal wire. The resistance increased as the wire did because there were more atoms then previously so more obstacles for the electrons to try to avoid but since all moving one way they collide with more atoms so build up the resistance. Also due to me keeping the metal wire’s temperature constant the results were not effected greatly. This was important because it meant that no excess resistance created by the vibrating atoms was measured which could have given anomalous results.
It does reflect my prediction well by actually showing what I thought would happen in a clear precise manner. It shows the steady increase of resistance as the length of metal wire is increased and from looking at my result tables you can see how the results do not differ much so show enhance the correctness of my prediction.
Evaluating Evidence
I think that my experiment was very good for showing what I wanted to do as it showed the answer to my title how does the length of wire effect its resistance? And also proved my prediction to be correct for the reasons I gave. I am glad that my results are accurate enough to draw conclusions from and say that my prediction was correct but since there are some differences between them I would not say that they were totally accurate but that they were quite accurate.
My results my not be totally accurate but they do show how resistance changes when varying the length of a piece of metal wire. I do think that they are good enough to draw some firm conclusions from, as there are not any anomalous results which means that they are most likely to be correct.
The results I have gathered are reliable, as they do not show anything, which you would not expect, but they do show what happens to resistance when varying the metal wire’s length clearly so could be said to be accurate.
Even though this is said I could do more to make sure that the results are as reliable as possible by next time getting 8 metres of new wire and taking more thickness’ to make sure that they wire was the same width all the way along.
To find out more about this variable and how it effects the resistance you could do half metres and work out how the resistance varies between lengths so giving you a more advanced knowledge of how temperature effects resistance. This could help if you wanted to find an equation linking resistance with length when not wanting to have to measure everything.