Resistance of a Wire
Aim
To investigate how and why the length of wire affects its resistance
There are four possible elements which cause the resistance of a wire to vary:-
) Length of wire
2) Width of wire
3) Temperature
4) Type of metal
Hypothesis
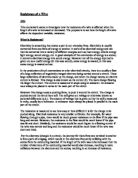
I think that as the length of the wire increases, the resistance will also increase but in direct proportionality. Therefore if the length of wire doubled, the resistance will also double. Hence, the graph of results collected should resemble the following:
It is because of the free moving electrons that the wire is allowed to transfer electricity; electrons moving from the negative to the positive terminals of the wire will create a potential difference which forces the arrangement of electrons in lines travelling in the same direction hence inducing a current. However, it is inevitable that they will collide with the larger nuclei of the atoms which cause resistance in the arrangement. It stands to reason that the longer the piece of wire, the more atoms are present; therefore, there is an increased number of nuclei in the wire, and a greater chance of collision with the flowing 'sea' of electrons. Because energy is distributed between the atoms in the form of electricity, when components collide, the electrons use energy which is transferred onto the atoms, thus allowing them to heat up. It is these collisions which slow down the movement of the electrons, and subsequently produce a resistance on the current. When the length of the wire is doubled, the number of atoms within the new length is also doubled, therefore the number of collisions increase by the same amount, meaning the resistance does so too.
Ohms Law
Resistance is "the property of hindering the conduction of electricity, heat etc."
It is measured in ohms (?), hence the name of this theory. Ohms Law states that if one volt is applied to one ohm resistance then the current will be one amp. The direct proportionality of the three factors can be seen through the equation linking them:
V = voltage
I = current (I stands for intensity)
R = resistance
Preliminary Experiment
To ensure that my method will be practical and will yield accurate results, a preliminary experiment was carried out. This allowed me to see any flaws in the experiment and correct them before conducting the main investigation.
Method: - I cut separate pieces of Constantan wire for each length (which increased by 20 cm each time with a range from 20-100cm) and attached each to a circuit which had an ammeter in a series circuit then a voltmeter in a parallel series beneath the wire and took the measurements for each. Afterwards, the Ohms Law equation was used to calculate the resistance.
Results: -
Length
(cm)
Voltage
(V)
Current
(A)
Resistance (I*R)
(?)
20
2.47
0.91
2.71
40
2.82
0.53
5.32
60
3.05
0.40
7.63
80
3.14
0.30
0.47
00
3.25
0.25
3.00
Conclusion: - From the preliminary experiment, I have found that there is evidence suggesting that my hypothesis is correct, as the resistance does increase as the length increases. Although the figures are not exactly perfect, I can ...
This is a preview of the whole essay
Results: -
Length
(cm)
Voltage
(V)
Current
(A)
Resistance (I*R)
(?)
20
2.47
0.91
2.71
40
2.82
0.53
5.32
60
3.05
0.40
7.63
80
3.14
0.30
0.47
00
3.25
0.25
3.00
Conclusion: - From the preliminary experiment, I have found that there is evidence suggesting that my hypothesis is correct, as the resistance does increase as the length increases. Although the figures are not exactly perfect, I can still see that when the length doubled, the resistance did so too. For example, the resistance for a 40 cm length wire was 1.96 times the resistance of a 20 cm length wire.
Evaluation: - The wire lengths were not exactly right therefore more care must be taken in the main investigation. Also, because I was cutting up different pieces of wire for each length, there was a lot of wasted material. To avoid doing this in the future, I can experiment using the longest length wire first, and then cut off the next length down from that. Hence I would only be using 100 cm of wire. Although the range is relatively suitable, I think that the gaps between the lengths are too large to give a particularly good indication of the correlation. Therefore I will be taking every 10 cms of wire from 10 cm to 100 cm. When the wire was being tested and cut, it formed loops meaning that the circuit was allowed to short circuit therefore the electricity jumped and missed a section of wire out, which decreased the accuracy of readings. In the real experiment I must ensure that these loops do not occur.
MAIN INVESTIGATION
Apparatus
300 cm Constantan wire
Ammeter
Voltmeter
Crocodile Clips
Calculator
Metre Rule
3 Cells
Leads
Method
. Cut 100 cm of Constantan wire
2. Connect the wire to an ammeter in a series circuit using leads and crocodile clips
3. Connect the voltmeter to the wire in a parallel circuit
4. Add the cells
5. Take down reading for the current
6. Take down reading for voltage
7. Calculate the resistance and place figures into table
8. Cut 10 cm off the wire
9. Repeat experiment from point 5. downwards until 10 cm of wire has been reached
0. Repeat entire experiment a further two times
The lengths of wire to be investigated are: - 10 cm, 20 cm, 30 cm, 40 cm, 50 cm, 60 cm, 70 cm, 80 cm, 90 cm, 100 cm. These will provide me with a set of clear, progressive results. The investigation is repeated twice as this ensures accuracy and allows me to average my results to decrease the effects of anomalies which may occur.
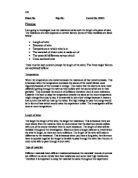
Diagram of Experiment
Fair Test
In order to make sure that the experiment yields results of the highest accuracy possible, the same wire must be used as the cross sectional area and material could affect the current and voltage. The readings must be taken immediately after connecting the circuit up because the collisions between the electrons and the nuclei cause the wire to heat up therefore giving the electrons more energy to flow faster. As found out in the preliminary, the wire must be completely straight so short circuits do not occur. The length of the wire is the only variable within the experiment.
Safety
. There must be no water near the circuit as it conducts electricity and could shock someone
2. When the circuit is switched on, the wire must not be touched as it can be extremely hot
3. The cell rating must not be too large otherwise the wire could melt under the surge of electricity
Results
Length
(cm)
Voltage
(V)
Current
(A)
Resistance (I*R)
(?)
Exp 1
Exp 2
Exp 3
Exp 1
Exp 2
Exp 3
Exp 1
Exp 2
Exp 3
0
2.28
2.23
.78
.59
.75
2.19
.43
.27
0.81
20
2.68
2.44
.90
.22
.43
.84
2.20
.71
.03
30
2.95
2.80
2.17
.05
.03
.52
2.81
2.75
.43
40
3.18
3.02
2.41
0.89
0.88
.28
3.57
3.43
.88
50
3.37
3.19
2.60
0.76
0.74
.10
4.43
4.31
2.36
60
3.54
3.28
2.84
0.68
0.64
.00
5.21
5.13
2.84
70
3.63
3.44
2.96
0.61
0.57
0.91
5.95
6.04
3.25
80
3.78
3.51
3.05
0.52
0.50
0.81
7.27
7.02
3.77
90
3.82
3.57
3.16
0.48
0.45
0.76
7.96
7.93
4.16
00
3.90
3.66
3.27
0.43
0.48
0.70
9.07
7.63
4.67
Length
(cm)
Average Resistance
(?)
0
.17
20
.65
30
2.33
40
2.96
50
3.70
60
4.39
70
5.08
80
6.02
90
6.68
00
7.12
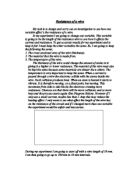
A Line Graph Showing the Correlation between Wire Length and Resistance
Conclusion and Analysis
From the graph drawn, I can see that as the point of origin of the line is (0, 0), the length of wire is directly proportional to resistance. The line is straight which indicates that the increases are constant. The graph shows a positive correlation which proves that both the length of the wire and the resistance will increase at the same rate. This rate is the gradient of the line;
Gradient = (difference in y) / (difference in x)
= (5.08 - 4.39) / (70 - 60)
= 0.69 / 10
= 0.069
Because I already know that the y-intercept of the line must be 0, I can put it together with my gradient to find an equation which directly links the length of wire to the resistance.
If y = mx + c; Resistance is substituted for y
Length of wire is substituted for x
M is the gradient
C is the y-intercept
Therefore;
Resistance = 0.069 * Length + 0
= 0.069 * Length
This means that for every one cm increase in the length of wire, there should be a 0.069 increase in the resistance. So for my results, because the length is increasing by 10 cm, each successive resistance should have 0.69 more ohms.
My results have proved my hypothesis that there is direct proportionality in the increases of the length of the Constantan wire and the resistance of it in relation to each other. This is due to the fact that as the length of wire became longer, the electrons which form the current have to flow past more fixed atom nuclei, so the number of collisions became higher therefore more resistance to the current was encountered.
The increases and decreases of each value correspond proportionally because the formula for Ohms Law shows that to keep a constant current; the voltage must be higher in order to compensate for the lengthening wire, hence the increase in resistance. The strongest trend in the data plotted is that with an increase in length, there is an increase in resistance which is directly proportional to the length. On the line of best fit, I can see that the wire of length 80 cm is 2.01 times larger than the wire half that length, which further proves the hypothesis.
When halved, there will be half the number of particles in the wire than before therefore half the number of potential collisions, which subsequently leads to half the amount of resistance. There are less atoms to block the paths of the electrons which are in a regular arrangement and lose less energy to the nuclei so can maintain their speed at which they are travelling.
Evaluation
This investigation has been quite successful as there are no obvious anomalous points on the graph. However, as these are only averages of the resistance, I must look at the raw data collected to find any problems encountered within the experiment.
There is quite a large difference between the figures collected from some experiments;
Length
(cm)
Resistance
(Range)
0
0.62
20
.17
30
.38
40
.69
50
2.07
60
2.37
70
2.79
80
3.50
90
3.80
00
4.40
I can see that as the length of the wire increases, the range enlarges. As was a problem in the preliminary experiment, this could be due to the short circuiting of the wire if loops had formed. The longer the wire is the more likelihood of the hoops occurring as it becomes more flexible. The short circuiting means that the electricity finds an easier route to travel down. Because the current jumps past some sections of the wire, the electrons can reach the positive terminal much faster.
In the next experiment, to ensure this does not happen again, the wire can be sellotaped to either the table or the meter rule so that it is unable to bend. Also, it makes the measurements of the lengths more accurate. To make even surer of the lengths, because I know that the electrons will only flow from the negative to the positive terminal, I can place the positive crocodile clip to the wire at 0cm and leave that alone for the duration of the experiments. With the negative crocodile clip, I can move it along the wire at the lengths I want to investigate, as the electrons would only flow in the direction of the positive terminal and not backwards.
As I was using the same piece of wire, instead of waiting for it to cool down before using it again, I continued immediately afterwards therefore there would already be more energy for the electrons to use. I know that the readings from the ammeter and voltmeter would be quite accurate as they were digital instead of analogue.
The entire set of results for experiment 3 is a bit strange as all the values are so much lower than in the previous experiments. The main reason for this could be that more heat was produced due to the friction produced when there is a surge of current. The collisions between particles and the transfer of energy onto nuclei also add to this heat. When there is more heat energy in the wire there is a reduction in the voltage output, which leads to a reduction in the resistance.
The lengths I chose to investigate were sufficient as they allowed me to plot an accurate graph. There were not too many lengths that I did not have time to experiment them all, but there were not too few to be able to tell if there was an anomalous point. Using Constantan wire was better than copper as it heats up less quickly, however, although I found that the method was more wasteful in the preliminary experiment, using separate pieces of wire for each experiment prevents using the wires which already have heat energy stored in them.
Crocodile clips perhaps were not the best method of attaching the leads onto the wire. As they have quite a large area, it may take a length of wire away, especially at the negative terminal. Instead, pointers could be used which are much more narrow and accurate.
To provide further evidence for my hypothesis, I could use the same method, only use different wire materials such as nichrome, and see if resistance is still directly proportional to the length of the wire. I think hat different materials should affect the resistance as they are made of various elements which have different numbers of electrons in their outer shells. A better extension to the investigation however, is to discover how temperature really affects the resistance, as the limiting factor on this investigation is the heat produced within the wire. There must be a point where the voltage from the battery is so large that the wire reaches its melting point and the circuit stops working.