Design idea 2 doesn’t have a title on it and also doesn’t have all the costs for every item recorded on it either. It does however show the number of plant bunches and plant packs that the customer will get which I think is the best thing about this design idea because if the customer enquires about how many plant bunches and plant packs he will get, Jo can straight away tell the person how many there would be instead of dividing the total cost of the plant bunches or plant packs by how much 1 of them would cost, so therefore design idea 1 for the calculator would be quite helpful in that respect. The areas where the user of the calculator has to fill in are going down vertically and the areas where the calculator will fill in after the user has input the measurements are going across horizontally, this would make it easier to decipher where everything is for the user.
Design idea 3 has the title “Pond Cost Calculator” on it, which helps it to be more user friendly. However there aren’t many different cells filled in so the title would take up about half of the calculator, which wouldn’t look good. The cells where the user is meant to fill in are straight under the titles of the cells and the total cost is straight under the title of the total cost, which is straight under the pond length cell. It’s the most basic of the 4 calculators in layout and would do the job but wouldn’t tell Jo other details that the customer might ask for. So I definitely wont be using this Design idea.
Design idea 4 has its title below where the value cells are and the title for the value cells are, which might confuse the user a bit. The value cells and titles for the value cells are laid out in a horizontal fashion and that to me looks worse than when they are laid out in a vertical fashion. So I will not be using this Design idea either.
I have decided to go for Design idea 1. This is because it has the most values available to Jo to use. Although Design idea 2 is simpler and easier to understand, design idea 1 can be a lot more helpful.
Text
For the calculator, I have considered all different text sizes and types and I have come up with the following decisions about what text it would be wise for me to use:
Value Titles: Size 10 Bold
Values: Size 10
Main Title: Size 18 Bold
The reason why I have decided on these text sizes, is because ‘10’ is the default text size and it’s the default because its not too big and not too small therefore I will use it for every bit of text other than the Main Title. I have chosen the Main title to be 18 because I think that because it looks to me like it would be the correct size in correlation to how much other text will be on the calculator. The main title and the Value titles are in Bold because they need to be able to stand out more than the text and bold does just that.
All text will be done in the text style ‘Arial’, this is because Arial is formal enough but not too formal so much so that it may appear unfriendly to the person who is using it.
Colours
Because this is only a calculator, I will not need a colour scheme. However I did decide on the design idea to have a light shade of grey filled in on the cells that needed measurements entered in them by the potential user of the calculator.
How I will make the calculator
I am now going to express how I will go about making the calculator by showing off the features of Microsoft excel that I will most likely need to use.
Formulas
>To make this calculator I will unquestionably need to have some formulas that will calculate the costs of different parts of the pond and the total cost for the pond.
There are 3 variables that could be of any measurement, width, length and depth. I could have 1 big calculation that jumps straight ahead to the total cost (like on every other design idea) but because all the other costs need to be separately done due to choosing the design idea that I chose, I will do several smaller formulas that work in steps to get to the total cost.
As an example of the way in which I would do the formulas, I will do the first formula which is for the cost of the pond liner:
Square A1 is the length
Square B1 is the width
Square C1 is the depth
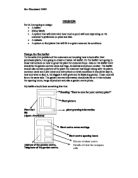
I have used the way Jo has stated to use to find out the pond liner in metres squared (which is 2.5 X the depth of the pond + the length of the pond X 2.5 X the depth of the pond + the width of the pond) then I have multiplied the answer by 4.4 which is how many pounds a customer pays per metre squared of pond liner. That gives me the cost of the Pond liner.
Currency
However I will need to show the answer in pounds. The way that I would do this is I would right click onto the cell with 79.2 in it, go to format cells then it brings up a box with that allows you to change the way the numbers are displayed in that cell.
Brings up this box:
Rounding Numbers up
Jo has said to me that I will need to round up to the nearest whole integer the number of Plant bunches and Plant packs. For example if the number of plant packs were calculated to be 5.1, I would need to round it up to 6.
I therefore need to find a way of rounding numbers up.
There is a ROUNDUP function on Microsoft Excel that can do this for me. If I was to round up a regular number with no formula to it, lets just say ‘3.5’, I would put the following the cell with 3.5 in “=ROUNDUP(3.5,0)” which would give me 4.
I will now use this on the formula I made for the cost of the pond liner. I know I don’t have to round up the cost of the pond liner but I will on this next example to show how I would use this ROUNDUP function on complex formulas.
As you can see, it works for almost any formula. I have to have roundup before the formula, put it all into brackets and have after the formula a comma then the amount of decimal places I wish to round the number up to that follows the comma.
Filling cells with light grey
I have decided on my design idea that I will need to fill in some of the cells with a light grey. The way that I would do this is I would drag over the boxes that I need to fill in with grey then go to the fill colour icon and finally click onto the colour I want to fill them in with.
Making Plan
I shall be making this calculator in an order
I will:
- Type in the title for the Calculator, then,
- Type in the value titles Pond width, Pond length and Pond depth, then,
- Type in all the value titles for the costs, then,
- Type in the formulas for all the costs, then,
- Type in the Total cost title, then finally I will
- Type in the formula for the total cost
>I will try to stick to this order when making the excel document because it will help me make the calculator more efficiently if I make it in a planned order.
Testing Plan
I will separate the testing up into 2 tests. One test will be a quick check to see if the calculator works for previously calculated Pond costs – Mrs smiths pond. This check will be done in the implementation. The other test will be for Mr Patel’s problem. I will use my calculator to see if I can calculate the depth he can have for the already assigned length and width of his pond to amount to no more than £300. This test will be done in the testing section. By doing these two tests I will have totally assured myself that the calculator works and will be fit for Jo to use.
I will do the check in the implementation by typing in all the measurements onto my calculator and seeing whether all the costs that Jo has calculated to be right are the same as the costs my calculator presents.
I will test my calculator with Mr Patel’s problem by using a system of trial and error. Putting in the width and length of his pond and continually keep changing the potential depth of his pond to be able to find out what is the maximum depth he can have without spending over £300. I will start higher than the price and work down to £300 instead of randomly typing in depths, this way I will work to the maximum depth faster. Or I could devise a System where by Excel can tell me what the maximum depth he could have.
It is important I do these two tests because I want to make sure the calculator works properly.