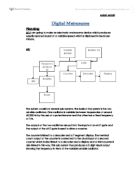
Sub-system in detail: Variable Astable Oscillator
This circuit diagram shows the variable frequency astable in detail. The basis of the sub-system is a 555 IC. The reset pin is tied high to ensure that the chip functions correctly. The control voltage (CV) pin is tied low with a 10nF capacitor as a frequency modulated output is not needed and the capacitor eliminates noise. The selection of resistor and capacitor values means that the 100K potentiometer can be used to vary the frequency as shown in the experiment later.
A3:
This website was used in researching some of the sub-systems of my circuit. Information such as the correct layout of a 555 astable was obtained from this site. This information is shown in clear diagrams and explanations that are easy to understand.
This website was used to obtain all the necessary IC pinots needed to build my system. The diagrams are clear and easy to read.
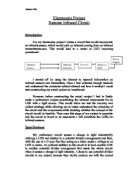
A4: Investigation into frequency of astable
The following investigation was carried out on the variable astable: The resistance value of the potentiometer was varied and the resulting frequency of the oscillator was recorded.
These are the results which were obtained:
These results and this graph show that as the resistance of the potentiometer increases, the frequency of the oscillator decreases. The rate of decrease in frequency is rapid at first but becomes much more gradual at a resistance of around 10KΩ.
A5:
My specifications for this project are:
-
The circuit must work with a 9v + 1v power supply so that it is able to operate with a 9 volt battery as well as a power supply.
- The metronome must operate at speeds of 40 – 300 beats per minute
-
The system must have a display output showing the speed of the metronome in beats per minute accurate to + 10%
A6:
Instead of using seven segment displays to show the speed, I could have used a different display system such as an LCD display. An LCD display would be capable of showing the same information as he seven segment displays and would possibly look much neater.
The reasons I decided to use seven segment displays over and LCD display are:
- Although the system would take up less space on its own, it may end up using more space on the board than the seven segment displays as it could possibly need a lot of decoders.
- Also I understand how seven segment displays work but I do not know anything about the workings of an LCD display so the use of it would require a lot of research ad I would be more likely to make mistakes hen using it.
A8:
A9:
Resistors
I have used the following resistors in my circuit:
- 4.7KΩ for the timing mechanism of the oscillators
- 1.2KΩ for protecting the 7 segment displays
- 100Ω to protect the LED and the rest pin of the counters in my frequency divide by 60 sub-system
-
All resistors have a tolerance of + 5%
The rail voltage of the circuit will be 9vand the maximum current flowing will be 10mA
P =V x I
=9 x 10ma
=90mW
So 0.25 Watt resistors will work fine in my circuit.
Oscillators
In a 555 astable the time period is (R1 +2R2)C / 1.44
For the 1Hz astable a time period of about 1 second is required
(4700 +2*4700)*0.0001 / 1.44 = 0.979 (3sf)
Therefore the resistors used will both be 4.7KΩ and the capacitor will be 100µF as 0.979 is very close to 1.
Realisation of a system
B2:
B2:
When constructing my circuit, I took great care to ensure that all polarised and active components were correctly orientated
B3:
Whilst working on my circuit I made sure to take safety into account. In order to do this I did things such as checking the polarity of any chips I used, and checking that I used the correct voltage on my power supply.
B4:
These results show that the display system works as the numbers displayed are within 10% of the frequency recordings taken earlier.
B5:
This proves that the whole system works as the frequencies obtained at the end are equal to within 10% of the original frequency of the astable divided by 60.
B6:
The first time I tested my circuit, it worked.
B7:
There were no faults to fix as the circuit worked on the first try.
Testing and Evaluation
C1:
To record data for the frequencies of the components in my circuit, I used a oscilloscope to determine the time period of the waves and then calculated the frequency by dividing 1 by the time period. For testing voltages I used a multi-meter as volt meter on the 20K setting and to probe leads.
C2:
I have recorded measurements relevant to my specifications as I have recorded the frequencies of the pulse that drives the buzzer ad LED at the end of the circuit and also taken readings from the 3 digit display to see how these match up to the actual frequencies of the pulse. The frequencies appear to match up to a certain degree of accuracy so the circuit works as it was intended.
C3:
My circuit worked as I intended which was for it to be an “electronic metronome device which produces equally spaced sounds at a variable speed which is displayed in beats per minute”. I have also met all of my original objectives:
-
The circuit must work with a 9v + 1v power supply so that it is able to operate with a 9 volt battery as well as a power supply.
All tests were conducted using a power supply on a 9 volt setting and the circuit worked as required.
- The metronome must operate at speeds of 40 – 300 beats per minute
As shown in the tests above the metronome operates at speeds of 6 to 308 beats per minute.
-
The system must have a display output showing the speed of the metronome in beats per minute accurate to + 10%
As shown in the tests above the display shows a reading which is within 10% of the speed of the metronome beats.
C4:
As the circuit worked as desired, there was no need to make any improvements to its workings.