In this experiment I am going to make my results accurate by recording the measurments on the wire board. therefor this means that evan if my measuring is not 100% accurate then it will not be 100% accurate on all the wires so therefor all the measurments on the wires are identical. Also to try and prevent the wires from heating up I am going to keep the lab pack on for as little amopunt of time as possible. Therefor this should hopefully meen that the resistance of the wire does not drastically change
I am going to make my results reliable my making sure that each det of results is repeated three times. This then makes it easier for me to point out any anomolies. If the experimet was only repeated twice it would be very difficult to spot anomolous results. Also any anomolous results will not be included when any averages are calculated.
There are not many safety precautions that have to be taken during this experiment however there are two main ones:
- Because you are working with electricity it is vital to make sure that there is no water near to the experiment.
- Also if the wires are been frequently used then they tend to heat up. Then can actually get rd hot. If by accident a lab pack was left on and then somebody touched a wire then they could potentially burn themselves.
- Results
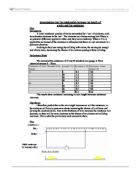
- Length = Variable Wire Width = 0.61mm
Any anomalous results have been higlighted (red) and these have then been excluded from any average takings (blue).
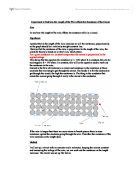
- From the above data I have managed to to calculate the below grapgh. On the grapgh is an r² formula. This formula is Spearman’s rank correlation coefficient theory. It basically is there to show the corrolation of a set of data. It works on the following principal:
Spearman’s rank correlation coefficient is measured in a scale from –1 to +1
| | |
-1 0 +1
Perfect disagreement No correlation Perfect agreement
Or perfect negative or perfect positive correlation
As you can see the r² value is virtually perfect. the only reason as to why it may not be perfect is because of slight human errors and the fact that under the conditions my results could not be 100% effective. However this graph shows that the relationship between wire length and resistance is directly proportional. This shows me that if I double the wire length I will double the resistance (see construction lines on graph). From this graph I can now make a near prefect estimate to the resistance if I have the wire length. I can accurately state this because all of my points are very close to my line of best supporting my conclusion further. However only between 10cm and 80cm. I would be able to make a very educated guess beyond this range I have no evidence to prove that the two factors will remain directly proportional. This evidence fully supports my prediction because as you can see the data is directly proportional. The reason why the resistance increases as I increase the length is because Resistance (Ohms) = p(rho)length
Area of the wire.
Therefor if I increase the length of the wire (numerator) then the resistance increases.
-Results 2
- Length = 15 cm Wire width = variable
The highlighted results above are done so because all the resistances are quite different. Because there is not two results similar. Therefor it is impossible to say which of the results is anomalous.
From the above table I managed to calculate the below graph:
The above graph shows the relationship between the wire width and the wires resistance. As you can see there is definitely no directly proportional results. To try and manipulate the data to show directly proportional results I could alter the width of the wire to area of the wire. I can do this by halving the wire width or diameter to create the radius. Then I can use the formula πr²
Having done the above I was left with the following results:
From the results shown on the previous page I can then produce the following graph:
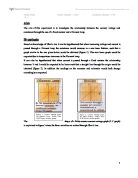
The above graph still does not give me directly proportional data. To manipulate the data further I am going to say that adversely proportional. This means that the wire area is directly proportional to 1/area.
When I manipulated the data in this fashion I created the following graph:
As you can see I now have a scatter with a straight-line trend line through the origin. You can see that from the r² formula that again there is a near perfect positive relationship. It is probable that r² formula would be 1 if it where not for the slight unreliability’s with the experiment. The reason that the resistance decreases as the width increases is because Resistance (Ohms) = p(rho) length
Area of the wire.
Therefor if I increase the area of the wire (denominator) then the resistance decreases. It is like any division sum. If you increase the second number then you will get a smaller answer.
-Summary:
When altering the length of the wire – length of wire is directly proportional to the resistance
When altering the thickness of the wire – area of the wire is inversly proportional to the resistance.
-Evaluation
In general I thought that this experiment went very well. I thought that in general I collected good reliable results that made it easier for me to see any anomolous results. This was made easier by the repition of results as when there wwere two similar results and one wild one it was obvious that the wild result was anomoulus. However if I had only had two sets of results then it would have been difficult to point out anomolous results. Because alll of my anomolous results where easy to spot they have been highlighted and removed from any average equations. There could be several reasons why a few of my results where anomolous. Probobly the main reason would be that the wire had heated up and therefor increased the resitance. However another possibility is that if you weren’t carefull the crocodile clips could rest in a thicker wire. Because there is a less resistance in a thicker wire the electricity would pass through that wire and give anomolous results also.
In general the results where reliable. One of the points in this experiment that could be argued is that all the wires heated up. If all the wires heated up proprtionally then I would still appear to get accurate results. However there is always a possibility that if the wires where kept at a controlled temperature then the resulta may have been different. Therefor to improve the reliability I could keep the wires at a controlled temperature. Also another thing that could slightly affect the results is the tightness of the wire. For example if one wire was very taught when I measured out 15cm on the board the taught wire would be 15cm long. Howeverif there was a loose wire there might be a dip in the middle this would ever so slightly increase the length of the wire causing a greater resistance. To avoid this I should have tightened all the wires brfore commencement of the experiment.
If I wanted to carry on the experiment then I could try longer and thicker wire to extend my graph. I could also compare the resistance in different wires made from different materials. I could also add time into the equation. From this I could then work out how the resistance of a wire changes as it heats up over time.