Another type of software utility is System Profiler, this software utility is used to give you a full profile of all the software and hardware on your system. This is helpful as you can then tell whether you have any unwanted software, and also if you buy a new piece of software, then you can check the requirements from it on your system profile. Windows has a useful program that is similar to a system profiler, which is called system information, which gives you information on your hardware, software and even internet settings and office settings. However, for a more concise profile you could use the 3rd party software Belarc Advisor, which gives a very precise system profile, and is available free from www.belarc.com/free_download.html .
Your computer will need protection from harmful viruses that can be caught from the internet, emails, downloads and numerous other things. For this you will need a firewall, which blocks connections from unknown sources, or sources that you have not specified as safe. Luckily, Windows comes with its own built in security feature, ironically called “Windows Security Center” which includes a firewall. If you want a more comprehensive protection against viruses, then you can choose to purchase a 3rd party firewall, such as Norton Personal Firewall, which can be bought or downloaded from the internet.
If a virus does manage to slip through your firewall, then a good antivirus program is essential to locate and quarantine harmful files. Although Windows does not feature an anti-virus on the operating system, if your pc is bought from a retailer such as PC World, then an anti-virus software may already be installed for you. However if you do not have an anti-virus installed then a good example of a 3rd party anti-virus is Norton Anti-Virus, which can be picked up in store or downloaded via the internet.
If you feel you do not have enough storage space, and decide to clear your hard drive or buy an extra one, then you need to go through a process called Formatting. Formatting basically erases all data and also prepares the disk to store your data magnetically. If you have a version of Windows that is XP or under, then there is a handy tool to use that formats your C drive for you, this is called FDISK which can be run from command prompt. If you have a Vista powered computer, then you can use a 3rd party formatting software or partitioning software, such as Norton Partition Magic.
- How to use disk defragmenter
First of all go to Start – Programs – Accessories – System Tools – Disk Defragmenter.
You will then get to this screen.
From this screen you can choose which volume that you want to defragment. For example if you take a look in the above picture, you can see the E: drive highlighted.
To continue, you can either go straight ahead with the defragmentation, or ask for an analysis of the volume you are defragmenting.
If you choose the analysis then you will receive this report, which shows you all of the fragmented files on the volume that you have analyzed.
When you have received the analysis you can either choose to defragment the volume or just leave it. To defragment, just click defragment. When you click defragment, the computer searches through the specified volume for fragmented files, and gathers the pieces of the same file and puts them back together, this will be represented by a loading screen. After this process, a report will appear on the screen, and then all you need to do is close the program.
How To Use Disk Cleanup
To start the disk cleanup, go to Start – Programs – Accessories – System Tools – Disk Cleanup.
At first the Disk Cleanup will calculate what files it can compress and delete, this will look like this;
After the computer has calculated what can be done to reduce the amount of space taken up on the hard drive, you will get this screen, which shows all of the options that you have to make extra space on your hard disk.
When you see this screen, select which actions you would like to do, for example delete the temporary files or empty the recycle bin to reduce the amount of disk space taken up. Then click ok. You will then get a screen that shows the progress of the action. It will look like this.
You have now finished your disk cleanup.
3. For my list of maintenance processes see the separate sheet.
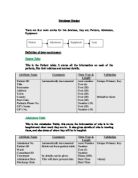
- How To Replace A Hard Drive
First of all, pull out the power cable from the back of the system, to make sure that there is no power source going into it, so you know you are not putting yourself at risk.
Next put on your anti-static wristband, and connect it to a non painted piece of metal on your case. The reason for using an anti-static wristband, is that it prevents static electricity building up, which can then cause an electrostatic discharge (ESD), this could seriously damage your motherboard and all of the components connected to it.
Next, take off the case cover on your computer, ensuring you keep any screws in a safe place so that you do not use them.
Now remove the IDE and Power cables from your HDD and remove it from the bracket/case that it may be in.
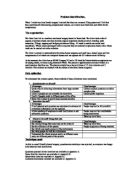
Now take your other hard drive, and make sure you set your jumper settings so that the hard drive is set to master, as seen below. To remove the pins use some small tweezers and be gentle, as not to bend the pins, then replace the jumper blockers in the appropriate position.
Now that you have set your drives jumper settings to master, remount it into the brackets that held it in the case and reinsert the power cable into the 4 pin power connector and insert the IDE cable into the 40 pin IDE connector.
Now slide your case cover back over the side of the case until the clips catch in and you are done.
5. How to install and clean peripherals
First of all I will tell you how to install your peripheral.
To install the printer, first plug the power cable into the plug socket in the wall.
Next plug the USB cable into your computers USB port.
Now insert the CD that came with the printer and run the setup file from the CD.
When the setup is complete, turn the power on, on the printer and it will configure itself.
Now to clean your screen, mouse and keyboard.
Take a screen wipe and gently rub it against the screen in a side-to-side motion and cover the whole surface of it. Certain types of monitor will require different types of wipes, as not to damage the monitor.
To clean the keyboard and mouse you can simply use the same screen wipe to clean around the keys on the keyboard and the buttons on the mouse. If you want to go more in depth with the cleaning, you can remove the keyboards keys to clean underneath and hard to reach places, and with the mouse, you can remove the ball and clean the dirt from the rollers that the ball rolls on (if you have a ball mouse).
6. For my agenda and minutes see the attached sheet.