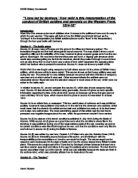
Source A5 (i) is a picture of the trench conditions published in July 1916 during the Battle of Somme. While source A5 (i) gives us a good idea as to what the conditions where like in the trenches, it was published during one of the most extreme parts of the war, meaning we cannot be certain conditions were like this throughout the war, and that the conditions were only like the one’s shown in source A5 (i) during the Battle of Somme.
Source A5 (ii) was written by war hero, Captain A.O Pollard who won the Victoria Cross (1919). Source A5 (ii) is an interesting source because of its author, and it’s linking in with the irresponsibility as far as decisions on how the war would be fought. The source says how the weapons were inadequate for the style of battle and how the enemy always knew Britain’s battle plans. This source is a major part of the “Lions led by Donkeys” phrase because it shows how a war-time veteran sees fault and idiocy in the way the soldiers where conducted. The fact that the source was written fresh out of the war (in 1918) can add reliability because the facts are fresh in the authors mind, which also probably affects how he feels about the war.
Section B – The “leaders”
The phrase “Lions led by Donkeys” is based on the leadership of the government and the on-scene leaders. This section gives information regarding the leaders from the sources.
Perhaps the man with the most influence on the at-the-scene battle was Sir Douglas Haig (1861-1928). Source B1 gives a lot of background information from a modern history book, which is considered very reliable. The source also gives an “official portrait” of Haig, which is reliable, however its purpose is to make Haig look a very strong and powerful figurehead to the war’s leadership. Haig was a very close friend to the King. This relationship is said to be one of the biggest reasons why Haig was in a powerful position during the war. What is said to be an insult to the soldiers is the fact that Haig never actually fought and “rarely saw the battle field” and that Haig was awarded £100,000 and made an Earl by Parliament. Source B2 is the letter that King George V sent to Haig on his appointment to Commander in Chief of the army. This source is considered reliable and also gives the impression that Haig and the King were close friends due to the language used. Many people believe that Haig was appointed in such a powerful position was because of his relationship with the King.
Sources B3, B4 (i) and B4 (ii) are written by Douglas Haig and therefore show his opinion on the war and its progress. It is uncertain whether the sources were written by Haig in his private diaries (unofficial) or whether they were written to be published (official). It is thought that the sources are written for official purposes because of their style and give a very positive image, which was needed to convince people that things on the battlefront were going well. If we could be certain that the sources were written officially of unofficially, we could determine whether Haig really felt the war was going well, or if Haig wrote the sources to put a “happy face” on the war and its progress.
The leaders of the war had the British newspapers on their side. The government could give so-called “official statements” as to the war’s progress, which would give the newspapers something to write about in their daily edition, which people all over the country wanted to read, and the government could control what the public actually knew about the war. Source B5 is an article published in the News of the World on the 2nd of July, 1916 about the first day in the Battle of Somme. This article is useful as far as us knowing what the public were being told, however it is very much unreliable because with hindsight we know that it is not an accurate report. The headline “The day goes well” is very inaccurate because there was 54,470 casualties on the first day, including 19,000 dead. The Battle of Somme lasted for 5 months and 415,000 British soldiers died.
Section C – Soldier’s experiences
This section is focused on the experiences of the soldiers and extracts written by the “lions” in the statement.
The government, to say the least, hasn’t always appreciated the views of Soldiers. Source C1 contains two poems written by war hero Siegfried Sassoon (1886-1967), who was nicknamed “Mad Jack”. Sassoon was sent to a psychiatric hospital after publishing the two poems for shell shock; this fact can be used as a reliability factor, as it would seem the government wanted the public to see Sassoon actually as “Mad”, as it be, and had something to hide by covering up Sassoon’s version of the truth. Sassoon’s experiences in the trenches led to him having a huge hatred towards the government and the way the war was conducted in general. The second poem is about how stupidity in leadership decisions led to the loss of many lives, which can be used to backup the statement of “Lions led by donkeys”. Sassoon’s “extreme” views on the war can be backed up by the official casualty and death figures in the British army. “Now the soldiers he smiled at are most of ‘em dead”. This quote provides a more cushioned image to the actual figures. Source C2 is the official figures. The source is some-what accurate, however these figures do not include the number of people missing or with parts unidentifiable. Again, backing up the phrase “Lions led by Donkeys”
Soldiers were very bitter towards their leaders and the battle plan in general. Douglas Haig was the leader who came under much of the blaze from the British soldiers. The extracts in source C3 are useful as they are written by ordinary soldiers and express a lot of hate towards Haig; however it is not certain that their feelings were shared by all of the army. Source C3 can be used to give an input on the feeling from British soldiers on the phrase “Lions led by Donkeys” because both extracts in source C3 make their feelings towards the leaders of the war very clear.
The British public were also some-what informed of the soldiers views on the leaders of the war. Source C5 is a cartoon from an edition of comedy magazine Punch, published in February 1917. The cartoon gives a lighter and probably less accurate account of what would have actually have been said in a training to make the punch line in the joke, but the general idea that the Generals weren’t directly involved in battle is still there.
Section D – Views on “Lions led by Donkeys”
Many people have thoughts on the “Lions led by Donkeys” phrase. This section evaluates some of the contrasting views.
One of the many views has come from the war-time Prime Minister, David Lloyd George. “The War Memoirs of David Lloyd George” book, written in the 1930s, is Lloyd George’s opinions on the war. Source D1 is an extract from his book about Haig and the leadership of the war. What’s interesting is the fact that the book was written over 10 years after the war happened, rather than during or shortly after the war. It is felt that the King may have tried to stop the book being written, should it have been written during or shortly after the war. This extract is fairly reliable due to its author; however it may be felt that the book is not entirely accurate. It is also not clear whether Lloyd George feels the commanding the army was too big a responsibility for any one, or just Haig. Source D1 does, however, support the “Lions led by Donkeys” interpretation. Source D3 also supports this view. Written by the well-known A.J.P Taylor, source D3 comments on the soldier’s morale and how the war leaders influenced this.
Source D2 contrasts from source D1. The source is a comment on the opinion of another historian, who believed the war was fought as well as it could have been. The historian who believes this has also written a number of books about the war including a biography on Haig, which isn’t done by some one who doesn’t feel strongly about the person. Source D2 challenges the “Lions led by Donkeys” interpretation.
Source D4 has a mixed opinion of the war. Written by a historian at the Imperial War Museum, D4 gives a more down-the-middle view, but does tend to challenge the interpretation “Lions led by Donkeys” in account of it mentions that some officers did die in battle.
Source D5 (i) also challenged the “Lions led by Donkeys” phrase. It takes the point of view that the generals in the war did their job to the best of their ability. This source is expected to be very reliable due to the fact it was published in a national newspaper. However, source D5 (ii) supports the “Lions led by Donkeys” interpretation. D5 (ii) is a letter in response to source D5 (i) and directly supports the “Lions led by Donkeys” interpretation: “…the donkeys they were, sent the young lions to their early deaths.” Sources D5 (i) and D (ii) are useful because it represents the fact that the argument is still not resolved today.
Conclusion
It’s clear that there are a lot of contrasting views as far as the leadership and their instructions in the war go, and the “Lions led by Donkeys” interpretation. It is important to realise there are different points of arguments and a number of pieces of evidence which add up to make more aspects believable than others.
It is important to realise that this debate will go on for many years, and as less evidence is being found, it’s getting harder to reach a definite answer.
I think that the “Lions led by Donkeys” theory is correct. I don’t think the British government knew how to tackle the German’s properly and underestimated their power and battle plans. My opinion is biased towards agreeing to the theory because I come from a family that would be involved in the war, should we have lived during the First World War and can see the perspective of the soldiers and the sources. I think the government were too concerned with the way they presented the war to the population because of sources B3, B4 (i) and B4 (ii) and also think that Haig was not the right man to lead the war, especially as he would have been more concerned about his image during the war because of his relationship with the king.