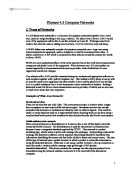
Below is shown a rough network drawing indicating signal strength boundaries every 10m, shown by the concentric circles.
-Drawing 2 - Wireless signal patterns -
Description of proposed hardware and cabling:
Research into the optimum Wireless Access Point to allow this WLAN to operate efficiently brought a number of different products to my attention. Through careful consideration and a comparison of the main characteristics of each product, the most appropriate WAP to install is the NETGEAR WG602. This access point boasts many features, the choice was made mainly due to its high access speed, the impressive level of network security it possesses and the upgrade-ability of the product ensures that it will easily be integrated into any future network changes.
802.11g 54Mbps Wireless Access Point
£60.25 Inc. VAT
NETGEAR's future-ready WG602 Wireless Access Point connects to all IEEE 802.11b wireless networks. With its high-speed data transmissions of up to 54 Mbps, it will allow employee server access times to be lower hence freeing up the connection for others more quickly. Users can share a broadband Internet connection; access e-mail, download large files and have videoconferencing capabilities. Easy to set up and use, the intuitive Install Assistant makes driver installation less demanding.
It simultaneously supports both IEEE 802.11b and 802.11g standard devices and networks. This dual mode capability protects your 802.11b wireless investment and, at the same time, has you ready for the up to five times faster 802.11g. Dynamic rate shifting according to environmental conditions achieves the fastest possible connections.
It also provides the highest available level of industry-standard WEP encryption: 128-bit for both 802.11b and 802.11g devices. MAC address authentication offers enhanced security by ensuring only authorized users can access the network. It will also support 802.1x and WPA with a future firmware upgrade.
Main Specification
- Table 1-
Research into the most sutable PCMCIA wireless cards that will allow the laptops to integrate with the WLAN efficiently brought a number of different products to my attention. Through careful consideration and a comparison of the main characteristics of each product, the most appropriate wireless card to install is the D-LINK DWL G650. This PCMCIA card boasts many features; the choice was made mainly due to its high access speed and the impressive level of network security it possesses.
Wireless 54Mbps 802.11g PCMCIA Card
£28.19 Inc. VAT
The D-Link AirPlusXtremeG+ DWL-G650+ Wireless CardBus adapter is an enhanced 802.11g high-performance, wireless adapter for notebook computers. This adapter supports high-speed wireless networking of up to 54Mbps, while providing seamless interoperability with all existing 802.11b and 802.11b+ wireless equipment. Together with better security, this adapter is the ideal wireless solution that offers an upgrade to a fast, new technology while protecting your past investments through interoperability with your current network equipment.
Main Specification
- Table 2 -
CAT5 UTP Patch Cable Green 2m Moulded
£1.50 ex. £1.76 inc.
The RJ45 Cat 5e patch is perfect for use with 10/100/1000BaseT networks.
Specification of network protocols:
Transmission Control Protocol/Internet Protocol (TCP/IP) is widely used for connectivity to the Internet and as a standard routable protocol for an organization-wide Internetwork. TCP/IP has become the standard protocol used for interoperability among many different types of computers. This interoperability is one of the primary advantages to TCP/IP. Because of its popularity, TCP/IP has become the standard for Internetworking.
Historically, the size and speed of TCP/IP had been its two primary disadvantages. TCP/IP is a relatively large-sized protocol stack, which can cause problems in Microsoft MS-DOS-based client computers. However, on graphical user interface (GUI)-based operating systems, such as, Windows 95 or Windows 98, the size is not an issue and the speed is about the same as Internetwork Packet Exchange (IPX).
Configuration and Installation of TCP/IP for Windows 2000:
Installing and configuring the TCP/IP protocol was often a laborious task for Windows users but with the introduction of Windows 2000, Microsoft allowed it to be installed by default once a network interface card was detected, and also included a command line scripting utility to aid configuration tasks for the administrator.
The program netsh.exe gives the administrator the ability to locally or remotely, display or modify the network configuration of a computer that is currently running. It allows for configuration of the TCP/IP settings such as the IP address, subnet mask, default gateway, DNS and WINS addresses amongst a number of other useful network tweaks.
To use the netsh.exe interface, all controls and input are executed by using the command prompt window. Commonly found on the start menu, but may be reached by typing cmd at the run command.
The following command allows you to view the existing TCP/IP settings.
The command shown below seems complex but it is simply a way of entering a lot of information at once. The makeup of the command is in the form of:
netsh interface ip set address name=”<Connection Name>” static <IP address> <Subnet Mask> <Default Gateway>
The information contained within the < > , are to be substituted with the numbers assigned to the network.
The netshe.exe program can also be used to configure the network interface card to automatically obtain an IP address from a DHCP server, by use of the command shown in the terminal window below. The second command is to show the IP settings to confirm the change has taken place.
Netsh.exe also allows the administrator to configure the WINS addresses by use of the command prompt. The command is shown below, again with the command to show the settings to confirm the changes have taken place.
Below is show a way of configuring the DNS address by use of the command prompt, with the line below demonstrating that the change has taken place.
Netsh.exe gives the administrator the ability to quickly transfer the settings from one computer to another, or if a computer changes its place of use hence the TCP/IP settings also need to be changed. The interface allows for the settings to be exported to a text file and also be imported from a text file of the same format. This command transfers the settings to the text file, redirecting it to a user specific location.
netsh –c interface dump > c:\ipsettings.txt
To recall it from this file and re-apply the settings type:
netsh –f c:\ipsettings.txt
Configuration and Installation of TCP/IP for Windows 98:
The configuration of TCP/IP on the Windows 2000 server machine is fairly straightforward, the configuration for the laptops running Windows 98 is a little more complex.
Again, when the Operating System discovers the presence of a network adaptor, it will install the necessary networking components by default, all that remains is the correct configuration of the protocols.
Before starting the configuration, the user needs the original Windows 98 disc along with all relevant network identification values.
From the Desktop, double click My Computer.
Then double click Control Panel, and then the Network Icon.
You are then presented with this screen;
To select the relevant components, click the add button to access the following window.
From this screen, select Protocol then click add.
Next the Select Network Protocol screen appears, giving you a choice of manufacturers and their associated protocols. Select Microsoft from the manufacturers list, then select TCP/IP from the protocols list. Click OK to proceed.
To allow for file and print sharing across the network, Microsofts client for networks will also need to be configured. Again, navigate through My Computer, into the Control Panel and then the Network Icon.
From the network configuration window, click add, you are then presented with this screen;
Select Client from the list and then click add. You are then presented with the following screen;
Select Microsoft from the manufacturers list and from the Network Clients list select Client for Microsoft Networks, then click OK.
At this stage you may be prompted for the Windows 98 cd-rom to allow for further installation files to be copied to your hard drive. You will then be prompted to restart the computer. When your computer restarts, you may be asked to enter your username and password for Windows Networking. For username, enter your first name. Leave the password field blank and click OK. The next window asks you to verify your password. Leave everything blank and click OK. Windows will not prompt you for the username password again
All necessary protocols should now be installed and ready for use by the network.
Wireless Capabilities Installation, Configuration and Encryption:
Once Server and Access Point are installed, configured and connected; and the laptops are fitted with the Wireless LAN cards, the laptops and the access point will need to be configured appropriately. All relevant IP addresses are shown in the table on the following page.
First section of this task deals with the setting of the IP address for the Laptops, if the laptops are configured one at a time, any problems with installation should be ironed out on the second or third one. The IP addresses should be set according to the table shown over the page, using the techniques explained in the earlier section on TCP/IP configuration.
Once the settings are changed the laptop should be rebooted and then a net browser opened with the page directed to the access point configuration page. The user should then select the IP settings and they will then be prompted for a login name and a password. The access point IP address should then be changed from the default setting to the one detailed in table 3.
Once the settings are applied and the access point is rebooted, the wireless connection will be lost temporarily until the laptop is configured. The configuration follows the procedure stated in the first paragraph of this section and is also detailed in the earlier section on TCP/IP configuration. Again the laptop should be rebooted once these settings have been changed to allow for the configuration to take place.
The user should next login to the laptop, but selecting to login to the workstation only, and then open a command prompt window. Using the ping facility the access point and the server should be tested for connectivity. If this is successful then the net browser should be re-opened, navigating to the access point settings page, and selecting the security settings.
The security settings page deals with all the encryption settings to allow for a secure network that cannot be infringed upon by a system without the relevant security ‘key’. To access the security settings the user will need to login as the administrator, entering the relevant password for this identity.
Next stage is to set the encryption key using the WEP protocol. This takes a common user initiated word or phrase and generates a number of hex keys that are unique to that word or phrase being input. The radio button for WEP should be set to enable, and the phrase should be entered in the appropriate space. The user should then click the button to generate the keys, and then click apply. At this stage it would be useful to write down the pass phrase and also the encryption keys, for future reference. The access point should then be rebooted.
The last stage of the laptop configuration is for the user to select the wireless icon from the taskbar, and then select the security tab. The WEP encryption should then be enabled and the appropriate keys inserted, once applied, the wireless link is running with full encryption.
These steps should be followed for each laptop, referring back to table 3 for all IP addresses, and once complete the network will be running securely with 128 bit WEP encryption, one of the highest encryption levels available.
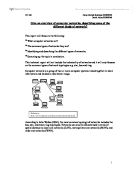
Network diagram:
Detailed below the connections between each of the Pentium III laptops with the portable USB barcode readers attached that allow the employees to use the wireless capabilities of the PCMCIA card to connect to the server unit and transmit stock changes to allow the records to be constantly updated.
- Drawing 3 - Detailed Network Diagram -
-Table 3 -
Resources Used
Used Internet for all research
MS Word for report compilation and table insertion
MS Visio for drawings and diagrams
VM Ware 4 employed as virtual machine for screenshots
Appendix of Sources
- For all searches
- Hardware research
- Hardware research
-Configuration and Installation
- WLAN designers web forum
– Website aimed at MCSE qualified personel
- TCP/IP configuration instructions
- WLAN configuration guide
All command prompt screenshots taken from Windows 2000 Server running on a virtual machine
All Windows 98 Network configuration screenshots taken from Windows 98 running on a virtual machine