Telescopes - research into types and properties of telescopes
Telescopes are instruments that magnify distant objects. Astronomers use telescopes to study the planets, stars, and other floating bodies. In most telescopes a lens or mirror is used to form an image of an object. The image may be viewed through an eyepiece or recorded on photographic film or by electronic devices. Telescopes produce images of objects too far away to be seen by the unaided human eye. The Dutch optician Hans Lippershey designed the first telescope in 1608, when he mounted two glass lenses in a narrow tube. Within a year the Italian astronomer Galileo built a similar device and became the first person to use a telescope to study the sky. Optical Telescopes Optical Telescopes use a lens or mirror to collect and focus light waves. There are three main types of optical telescopes. Refracting telescope Refracting telescopes also known as refractors have a large lens called an objective lens at one end of a long, narrow tube. The lens is convex on both sides so that the middle of the lens is thicker than the edges. The glass slows the light rays as they pass through the lens. (A wave is slowed most in the middle of the lens where the glass is thickest). The lens therefore causes the entire crest of the wave to arrive at the focus at the same time. Refractors with a magnifying eyepiece invert the image so that it appears upside down as astronomical observations

The History, Development and Use of the Light and Electron Microscope.
The History, Development and Use of the Light and Electron Microscope Fatimah Jilani Over time, our knowledge regarding matters in biology has developed quite rapidly with the use of microscopy. The use of microscopy has allowed us to look further into the physical side of biology especially in terms of cell ultra structures. Without the use of microscopes, we would never have even discovered cells let alone being able to know the characteristics and effects of minute detail, which is visible only through the Light and Electron Microscope. During the historic period known to be the Renaissance, there took place the inventions of gunpowder and the mariner's compass which then lead to the discovery of America. However, during that period came the equally significant invention recognized as the microscope. The microscope being an optical instrument that uses a lens or a combination of lens to produce a magnified visual image of small minute objects. The invention of the microscope gave light to details of worlds within worlds. Looking at the advances of the technology behind the microscope you begin to wonder about the beginning of microscopes and what triggered off this development. The earliest simple microscope was purely a tube with a plate for the object being viewed at one end and at the other end, there would have been a lens, which would give a magnification, which

Microscopy. History of the microscope:-
Microscopy Microscopes are tools which allow us to see objects which we cannot see with the naked eye. There are two main types of microscopes used nowadays. These are light microscopes and electron microscopes. During the 16th century the microscope was invented, which was of great assistance to works in medicine and biology. At first, the microscope was basically used recreationally, and was found in the homes of wealthy people. However, not long afterwards, proper uses for the microscope were discovered, and so study of bacteria and diseases began. History of the microscope:- * Circa 1000AD - First vision aid was invented called a reading stone. It was a glass sphere that magnified when laid on top of reading materials. * Circa 1284 - Italian, Salvino D'Armate invented the first wearable eye glasses. * 1590 - Zaccharias Janssen and his son Hans Janssen experimented with multiple lenses in a tube and observed that objects appeared greatly enlarged * 1665 - Robert Hooke noticed some "pores" or "cells" in a sliver of cork looking through a microscope. * 1674 - Anton van Leeuwenhoek built a simple microscope with only one lens to examine blood, yeast, insects and other tiny objects. He invented new methods for grinding and polishing microscope lenses that allowed for curvatures providing magnifications of up to 270 diameters, the best available lenses at that time.

Investigating the Power of a Diverging Lens
Investigating the Power of a Diverging Lens Aim: To find the power of a given diverging lens by using a pre-selected converging lens. Outline: The power of two lenses placed together in line to an object will allow both of their powers to add together. P1 + P2 = Ptotal Therefore, by using a combination of 2 lenses, one of which the power is known, I can find the focal length of the combination of lenses and then calculate the total power. The power of the converging lens can be subtracted from the total power to find the power of the diverging lens. Variables: Independent: Object distance Dependent: Image distance Control: Object size and shape, power of both lenses, material of both lenses In my pre-tests, I have found that I obtain a reasonable range of results using a converging lens of 10 Dioptres that is larger than the power of the diverging lens therefore giving reasonable results. Method: . Set up apparatus as shown in diagram. 2. Adhere the unknown diverging lens to the known, pre-selected converging lens with plasticine ensuring that the plasticine does not interfere with the light i.e. the plasticine does not cover the main central portion of the lenses. 3. Fix the lenses on to the stand with plasticine, making sure that they are perpendicular to the ground therefore the light that falls upon the light will be in line with the normal at the centre of
The Principles and Limitations of Scanning and Transmission Electron Microscopes
The Principles and Limitations of Scanning and Transmission Electron Microscopes Electron microscopes were first developed due to the limitations of light microscopes (3). The smallest object that can be viewed by any microscope is half the wavelength of light used, and objects smaller than this cannot be seen. This is because the object has to be large enough to interfere with the waves radiation. Light has a wavelength between 400-700nm, so the smallest object that can be viewed using visible light is 200nm(3). By the early 1930's all the possible scientific progress on understanding the inner parts of cells had been made, and scientists wanted to see more detail. Max Knoll and Ernst Ruska then developed the electron microscopes in 1931 (7). Electron microscopes use the same principles as light microscopes, but a beam of electrons is used instead of a beam of light. Electron beams have a wavelength of about 0.005nm. This short wavelength means much smaller objects can be seen (3). The resolution of a microscope is its ability to distinguish between two objects that are very close together. Magnification shows the objects as one larger image. The shorter the wavelength, the better the resolution. Therefore the resolution of an electron microscope is better than a light microscope. The magnification is also better. Magnifications of x250 000 can be obtained with an electron
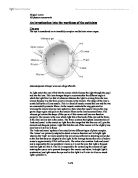
An investigation into the workings of the opticians
An investigation into the workings of the opticians The eye The eye is considered as an incredibly complex and delicate minor organ. Acknowledgement of image: www.nei.nih.gov/health As light enters the eye it first hits the cornea which focuses the light through the pupil and into the lens. This lens changes shape to accommodate the different angle at which the light hits it so that at whatever distance the light is coming from the lens always focuses it so the focal point is always on the macula. The shape of the lens is controlled by the cilliary muscle. This is a band of muscle around the lens and the two are connected by zonular fibres. As the muscle contracts the ring gets smaller allowing the lens to become more spherical, then when the muscle relaxes the ring grows larger again and pulls on the zonular fibres so the lens becomes flatter. The vitreous gel retains the shape of the eye so all the cornea and lens can function properly. The macula is the area which light hits at the back of the eye and the fovea is the small yellow dot in the centre. The fovea contains the highest concentration of 'rods and cones' in the macula so light from the image that hits this area will give the clearest and sharpest picture. Light that hits the rest of the macula will be slightly less clear but will still be in focus The 'rods and cones' spoken of are actually two different types

Aim To determine the refractive index of a material and the speed of light in order to calculate the expected critical angle at which total internal reflection occurs
Practical Experiment 3: Refraction and Reflection of Light Aim To determine the refractive index of a material and the speed of light in order to calculate the expected critical angle at which total internal reflection occurs. Hypothesis As the sin of the angle of incidence increase, the sin of the angle of refraction also increases Theory There is a strong relationship between the angle of incidence and angle of refraction of lights. Light can pass through different materials, assuming that it is transparent. It can also pass through two different isotropic materials such as air to glass. When light passes from one isotropic material with a high refraction index to another isotropic material with a lower refraction index, there is an angle where light passing through gets reflected and refracted (Young 2011). Snell brought up a law, which determines the angle at which light bends according to the initial angle and also the refraction index of materials. Where he derived the formula; where = refractive index of material a = refractive index of material b = sin of angle of incidence = sin of angle of refraction (Young 2011) However light may not be refracted all the time, as there is a point where the light will not pass the second material, this is when light gets reflected at the surface. This angle is known as the angle of refraction. Equipment: Light Box

The advantages and limitations of electron microscopy.
The advantages and limitations of electron microscopy There are two main branches of microscopy that are pertinent to cell biology. These branches arise from the two types of microscope; the light microscope and the electron microscope. The basic principles of light microscopy have been known since circa 17th century, however improvements in lens manufacture in circa 19th century allowed the use of microscopy to be much more practically available and useful. This is increased ability inspired rapid research into both the design of microscopes and the preparation of specimens. However, the light microscope can only magnify objects bigger than 0.2 micrometres; due to its limited resolving powers. This is because it utilises a beam of light. Relatively, light has a long wavelength, this means that when there are two small points close together there is too much refraction and wave front overlap, the eye then only sees one point. This can also be considered in terms of objects "crossing the path" of the wavelength. The smallest wavelength of visible light is 400nm, the diameter of mitochondria is 1000nm, and therefore mitochondria cross the path of the light wave. However ribosomes have a diameter of 22nm, and do not cross the path of the light wave and are therefore not seen by the light microscope. As biologists came to realise these limitations they understood that the

Measuring the focal length of a lens for red and green light- Case Study
Measuring the focal length of a lens for red and green light- Case Study The case study that I will be studying is how the focal length of a lens for red and green light differs. Eye defects is not something that is new it has been occurring for many years. Corrective lenses were said to be used by Abbas Ibn Firnas in the 9th century. Around 1284 in Italy, Salvino D'Armate is credited with inventing the first wearable eye glasses. Focal length and optics both are related to the eyes. The eyes are used to see things without the eyes we would not know where we are going or what anything looks like. The diagram to the left shows a diagram of the eye. http://kidshealth.org/kid/htbw/eyes.html The image above is of the human eye. The way the human eye works is that light enters the eye passing thro the iris, pupil and cornea. Once it reaches the lens of the eye the lens refracts the light further and it is made to converge at a single point at the back of the eye where the retina is. Once this happens the optical nerve sends messages to the brain and it is the brain that actually converts this to an image for us to see. The lens of an eye works in a similar way to a converging lens. A converging lens refracts light that passes through it to a single point; this is known as the focal point. The diagram below shows some information on the focal point and focal length:
I intend to show how the position and nature of the image can be worked out using ray diagrams - I will use various formulas to aid me in figuring out the focal lengths.
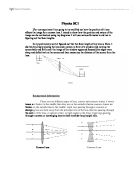
Physics SC1 ]For my experiment I am going to try and find out how the position of a lens affects the image for a convex lens. I intend to show how the position and nature of the image can be worked out using ray diagrams. I will use various formulas to aid me in figuring out the focal lengths. In my preliminary work I figured out that the focal length of my lens is 10cm. I did this by simply placing the lens and a screen in front of a window and moving the screen back and forth until the image of the window appeared focused (the edges were sharp and definitive) on the screen and then measuring the distance of the screen from the lens. Background Information There are two different types of lens, convex and concave lenses. Convex lenses are thicker in the middle than they are on the outside whereas concave lenses are thicker on the outside than in the middle. Light rays passing through a concave or diverging lens are bent away from the principal axis of the lens (the line passing through the center of the lens, or optical center, at right angles to the lens). Light rays passing through a convex or converging lens are bent towards the principal axis. When light rays have passed through a convex lens they eventually meet (unless there are special circumstances which will be mentioned later on) the point where they meet is called the principal focus (F). The distance of F