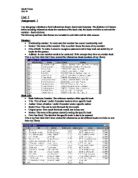
I have formatted this set of information as a short date because each input in this column is
a Date of Birth. For the same reasons I have named the field as date/ time. I have included a validation rule for this field, it being that only people above the age of 11 can join. If a date of birth meaning that the person is under the age of 12 is applied then a validation text will appear saying that this person is too young to become a member of my book club. I have chosen not to index this field because it is neither a primary key or unique.
Tables: Member Information
Address
I have made the address of each member text because this is how the data will be shown. I have made the field size 50 because none of my addresses exceed this limit. However if needed, this field size could be increased. I have not indexed this field size because it is not a primary key or unique.
Tables: Book Info
Book Reference Number
I have made the data belonging to this field autonumber because it has also been made a primary key. Each time that the title of a new book is entered it will automatically receive a reference number. This piece of information is required because I have made it the primary key for its table. I have indexed the field with no repeated numbers because I do not want any two books to have the same reference number. This piece of information is required for each book because I am using it as the primary key and it will make it easier for me to find out about books by knowing just their reference number.
Tables: Book Info
Book Title
I have chosen this data to be shown in text because that is how the book titles are written. I have lowered the field size to twenty-five because that is the maximum amount of letters included in the title of each book. This however is easily changed if a new book should have a longer title. This data is required because although I would still have the reference numbers to refer to, this will make it a lot easier to find specific books. I have chosen to index this data because no two books should have the same title.
Tables: Book Info
Author
This data is to be shown in text because it is always a person’s name. The field size for this is the same as the member’s names field size because none of the authors’ names exceed the limit of 30 digits. This can also be changed if required. I will allow the names in this column to be duplicated in case I have two different books by the same author.
Tables: Book Info
Rental Price
The data for this field will be currency because it needs to be displayed in pounds and pence so that I know how much it costs to rent each different book. Because the field is a price I have made its size long integer. I have made this so that there is always two decimal places shown as with all prices of everything. This field of information is certainly needed because I need to know how much to charge for the hire of my goods. I have not indexed the field because it is possible that two or more books could each have the same rental price.
Tables: Book Info
Book’s Original Price
This data type is also currency because it displays the original price of the book in pounds and pence so that I know how much a customer needs to pay to replace a book, should they lose or damage it. Once again because of the field being a price I have made it long integer. I have done this for the same reasons as with the rental price. Again I have not indexed this field because it is possible that two books may have the same price.
Tables: Book Info
Rentee
This is the name of the person renting the corresponding book. The configuration for this field is the same as for the rentee field in the Member Information table.
Tables: Book Info
Date Due Back
I have chosen this data type to be date/time because it is a date stating when the currently rented book is due to be returned. This is only required if the book is currently being rented. If a book is not being rented at that time then obviously it will not have a return date. Again this field is not indexed because it is neither the primary key and the information can be duplicated.
Tables: Member/Book Relations
Membership Number
I have included this field in my third and final table so that I can easily find who is renting what book. Because of this I have not needed to add the member’s names to this table as I can just match the member’s numbers to their names. This is a number field because all it states is the membership number of each member. This data is both required and indexed because it is both my primary key and I do not want any of the numbers duplicated.
Tables: Member/Book Relations
Current Rented Book Reference Number
I have included this so that I can easily link a reference number to the title of a book, and so I can simply link a membership number to a book reference number. I decided to use the book’s reference number rather than its title because it is just one/two digit/s as opposed to many and it can be linked to the name of a book at the book info table. I have chosen the data type for this field to be number because that is what the reference number is. As long as the member is renting a book, this information is required because I need to know who is currently in care of each book.
Tables: Member/Book Relations
Return Date
I have chosen to set this field as date/time because the column contains a date which the members currently rented book must be returned by. As long as there is a number in the corresponding member’s Book Reference number in this table then this is required because I will need to know when the book’s are due to be returned and whether they are late. This field is not indexed because it is possible that the dates in this column could be duplicated.
Tables: Member/Book Relations
Outstanding Fines
This column’s field has been set to currency because an amount of pounds and pence may be required to be typed in it. It is not required that a number must be typed in here because hopefully not everybody will owe money. This field is not indexed because once again it is possible that sums will have to be duplicated.
Relationships
My database is a Relational Database so I had to create a direct link between all three tables so that each can refer to the other. I started by clicking on the Relationships option on the toolbar. I made three tables, identical to those which I originally entered the data into, and titled these tables book info, member/book relations and members. I then had to decide how I was to link the three tables.
I chose to link rentee from the book info table to rentee in the member/book relations table and then rentee from there to membership reference number in the members table.
Queries
I have created queries for my database so that it is far easier for the user to find specific information about members or books in the club. My queries can be used to show which books are available by specific popular authors. I created my queries by choosing which data was important regards the book/author, and placing them in a separate table.
Example:
A very popular author is Sir William Wright so it will be useful to create a query for his books so that when people come into the shop asking for one of his books I can easily find out about their availability.
I start this by first choosing to create a query and selecting which details are relevant to the search. In this case I thought that it would be necessary to know the books ID number, Book Title, author, Rental Price, and if it is currently unavailable, when it is due back to the library. I select these options by clicking once on them in the available fields box and then clicking on the circled button. This transfers them to the selected fields box.
Once I have chosen a name for the query (in this case “Books by Sir. William Wright”) I was presented with this table where I had to add the criteria that makes a book allowed to be in this query. In this case it was of course important that William wrote the book so underneath the author column and in line with “Criteria” I typed the name “Sir William Wright”.
When I have completed this query I am presented with the three books that are written by William. This will make the job of the librarians a lot easier.
This database is very important, holds a lot of information and would take a long time to recreate, should it accidentally be deleted. For this reason it is important that I create a backup copy. This is easily done by right clicking on the icon that represents the document, in its folder and then selecting copy. I can then open a new folder and paste it in here.
Testing my Database
Obviously because my database will be used in the library it is very necessary that it works properly. For this reason I will now show a number of screen shots that show my database is working correctly.
- It is necessary that new books/members can be added to the database.
This is easily done. I shall show what you would need to do to add a new member.
First you must go to the members form where you will find a large button displaying the command “Add new member”(shown circled).
Clicking on this will take you to a blank form where you simply just have to type the new member’s name, date of birth and address. The computer fills in the AutoNumber itself when the form is completed.
- the user should easily be able to find the desired member without having to trawl through the files of everyone.
Once again you need to go to the members form but this time click on the large button reading “Find Rentee”. Clicking on this should bring up a menu like the one shown here.
You now need only type the name of the member you’re trying to find and then click find next. This should allow the computer to automatically find the desired person.
Creating Forms
Originally my database could only be viewed in a number of continuous tables. Not only were these boring to look at but also any searching for members or books had to be done manually. By turning these into forms they look far more attractive and interesting and the computer can be used to search for desired results. I will explain how to search for these things later but now I will explain how I created the buttons and the rest of my forms. These buttons are basically short cuts that take you automatically to different forms and parts of your database. My database will consist of three forms: a main menu and a form for each of the three sections of my database.
I start by selecting Forms and then “Create form in design view” from the main options page.
This takes me to a blank form, on which I can begin to place buttons and assemble it as I require. On the main toolbar I selected view and then toolbox. This made the toolbox appear on screen. The icon shown circled is used to create buttons. You do so by selecting it and then dragging the box to the shape and size you would like it.
When you’ve drawn a box the Command Button Wizard appears on screen. Here you can select what type of button you would like and specify what you would like it to do. Because for this example I am creating a main menu page I would like this button to open one of the three forms. I clicked on “Form Operations” and then selected “Open Form”. I completed this stage by simply clicking next.
The next page asks me to choose what other form I would like the button to open. This can be easily selected by just clicking on the chosen form’s name. Obviously it is sensible to select a different form to the one you are making the button for.
I named my button and clicked Finish so that it appeared on my form. I have also added some colour to my form to add to its attraction. This was simply done by right clicking on the form and then selecting “Fill/Back Colour” and then the colour I wanted.
This is my final main menu page. Each button leads to a different form and each form contains a route back to the main menu. This new layout of my database looks a lot better and is a lot easier to work your way around.