For this experiment I have chosen to limit the investigation to the length and cross sectional area as the factor I am going to vary. This is because considering the evidence I have gathered so far, I have found that the length of the wire should be directly proportional to the resistance. This should be easy to investigate and give accurate results. The cross sectional area of the wire should do the same, except it is not in direct proportion to the resistance of the wire.
Apparatus
I will now list the apparatus we will need for this experiment;
- an ammeter
- a voltmeter
- six wires
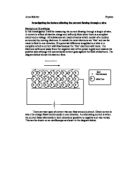
- different lengths of wire on wooden board
- battery pack
- two crocodile clips
Prediction
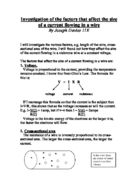
I predict that the longer the wire, the higher will be the resistance. Therefore the current will be lower if the voltage remains constant. I also predict that the thicker the cross sectional area of the wire, the less resistance the wire will offer will offer due to the availability of more space for the electrons to pass through. The length of the wire should be proportional to the resistance, whereas the width should still correlate but not be directly proportional.
Fair test
To make this experiment a fair test we will need to make sure that only the chosen factors affecting resistance are changed throughout the experiment. This means that I will have to keep the type of wire (i.e) Material)
Analysis
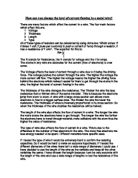
From analysing my graphs it is obvious that current and voltage vary with length and thickness. As the length of the wire increases, the current decreases and voltage increases. The highest current reading in the thickest wire and vice versa, the voltage was highest in the thinnest wire.
Therefore i have confirmed that my prediction was correct and that as the length of the wire increases, the current will decrease and the voltage will increase. I think this is because as the length of the wire increases, the resistance increases, therefore the current will be less due to more resistance. Electrons are pushed out through the wire at the beginning of the circuit. This electrical pressure is measured in volts (V). Across the whole circuit, each resistor i.e. light bulbs, buzzers etc. (anything which tries to restrict the electrons movements) there is an electrical pressure difference which occurs, called potential difference or voltage, measured in volts (V) this data can be collected with a voltmeter. The voltage needs to be measured at two places within a circuit due to the pressure difference which is lost in the circuit. One end will be measuring where the circuit starts on the wire and the other where it finishes on the wire. Consequently the voltage will increase, because as the resistance in the circuit increases there will be a bigger pressure difference along the wire. Therefore the voltage reading will be higher because the potential difference will increase.
Resistance in a wire is affected by four different points:
- The resistance in the wire increases as the length does.
- The resistance decreases as the thickness or cross-sectional area increases.
- The material of wire, copper, nylon, etc.
- The resistance is also affected by its temperature, the higher the temperature the higher the resistance.
The current flowing through the wire is directly proportional to the potential difference (voltage) across it (providing temperature remains constant). So if the current it doubled, so is the voltage.
Resistance (R) = Potential difference (V) / Current (I)
Symbols: R=V/I I=V/R V= I.R
Where V = Potential difference in volts (V)
I = Current in amps (A)
R = Resistance, in a unit called an ohm (Ω)
Table to show resistance in the wires:
Again, this supports my prediction because as with the length increasing the resistance is increasing and the resistance is more the thinner the wire.
Evaluation
My investigation went well. I used an appropriate method which was adequate to allow me to collect results which supported my prediction. I gained accurate results which showed a clear pattern and confirmed my hypothesis. I think my results were good, because I did two runs for each length on each wire to try to eliminate anomalous results. My results were also accurate because both meters were to 2dp, therefore precise. I got two anomalous results which I eliminated from the averages on my table; therefore all the points on my graphs fit the trend quite nicely. I think the two anomalies happened because perhaps the crocodile clips touched the other wires on the board at that point, skewing the results slightly. To improve my method and make sure that the results are accurate as they could be, between readings I could take the wire’s temperature to make sure that it is kept constant. During this investigation I had to assume that the wire did not get hot enough when turned on for the readings that it would make a difference.
Therefore I can support my conclusion because my data is reliable and supports my prediction.
To extend this experiment consequently I would like to investigate the effect of the type of wire variable on current and voltage and resistance in a wire, as this will also provide further evidence for this investigation of electricity in a wire.
For this further experiment I will therefore be using a copper wire.
Apparatus
- A power pack, as energy supply for the circuit.
- Five leads, to connect the circuit together.
- Crocodile clips, to connect the wire to the circuit.
- Three copper wires (one thick, one medium and one thin).
- A digital ammeter, to measure the current accurately.
- A digital voltmeter, to measure the voltage accurately.
- A ruler, to measure the length of the wire to be used.
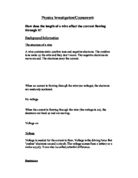
Method
- Set up the equipment as shown in the diagram of the circuit, picking one of the three wires to start with and a length (e.g. 10 cm). Make sure the power pack to two volts.
- Turn the power pack on so that you have just enough time to take a reading from the digital ammeter and voltmeter and turn it off. This will prevent the wire getting hot and skewing the next set of results. You are looking to read the voltage and current to two decimal places.
- Next, move a crocodile clip up ten centimetres and repeat the above process.
- Once done, keep moving the clip up in steps of ten centimetres at a time up to 90cm, repeating the aforementioned process each time.
- Run the entire step process for each length on all three wires twice (i.e. Two runs for each wire).
The results for this experiment should show a contrast in results from copper wiring to nichrome wiring, as nichrome offers more resistance than copper.