Photosynthesis
is the process by which plants, some bacteria, and some protistans use the energy from sunlight to produce sugar, which converts into , the "fuel" used by all living things. The conversion of unusable sunlight energy into usable chemical energy is associated with the actions of the green pigment . Most of the time, the photosynthetic process uses water and releases the oxygen that we absolutely must have to stay alive.
We can write the overall reaction of this process as:
6H2O + 6CO2 → C6H12O6+ 6O2
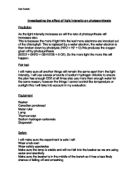
Apparatus
- Sodium bicarbonate
- Scalpel
- Spatula
- Test tube
- Beaker
- Boiling tube
- Thermometer
- Metre ruler
- Bench lamp
- Stopclock
Safety
- We must wear a lab coat and a pair of goggles because of the fire from the Bunsen burner when we try to heat up the water. So we need to be careful when we boiling it.
- We must be concentrating when we are handling the glassware because they are really easy to break, so we need to take care on it. Also the scalpel is really sharp, so we need to be extra care with it.
Method
Firstly, we need to get everything from the list of apparatus above, but before we start doing the experiment, we need to boil the water into the temperature of 20℃ which should be the room temperature. We can do this by using a beaker of water with a thermometer, Bunsen burner, heatproof mat, tripod and gauze. However the experiment will be more successful if we can get the temperature as close as 20℃ as possible.
When the water is ready, we can start our actual experiment, first we need to set out our apparatus. We need to put up a bench lamp with a metre ruler beside, because we need to measure how far away the light is from the plant. Also we need to get a test tube and put a small part of plant in it, we can cut it with a scalpel.
Before we start courting the bubbles come out from the plant, we need to put some sodium bicarbonate in it for the reaction, because photosynthesis needs light, water and carbon dioxide. However it doesn’t matter how much sodium bicarbonate we put it in, as long as we can see some in the bottom of the test tube.
In this experiment, I am going to try five different distances, for each of them I will be doing it three times, so it can be more accurate. For the first time, I tried 50cm away from the light and I am going to court how many bubbles come out from either end of the plant in one minute. Then for the second time, I am going to do 40cm until I reach 10cm away, then I will start again for accuracy. When I finish three times of five different distances, I will work out the average and plot a graph to show how light intensity changes the rate of photosynthesis in plants.
Diagram
Results Table
Results
From the results table above and the graph, it clearly shows that when the distance of light is closer to the test tube, there will be more bubbles produced. This is because the light intensity helps plants to photosynthesis quicker and the amount of bubbles produced means the speed of photosynthesis. However light is only one of the main sources that photosynthesis needed, by that means the other two sources, temperature and concentration of carbon dioxide, should also help plants to increase the speed of their reaction.
So these results can tell my prediction is right, because when more light intensity is supplied, the plant can increase their rate of photosynthesis. And this proves that my prediction is right.
Conclusion & Evaluation
I think my experiment had been working very well, because I don’t seem to have any anomalies results and the rest of the results seem to be perfectly fit. So I have done my experiment accurately and it goes well.