To explain why enzymes speed up reactions it is based on the collision theory. The enzyme’s, which are immobilised in the yeast-based beads, will give many active sites for the substrate (Hydrogen Peroxide) to bind (‘lock’) with. This will increase the collisions and therefore the rate of reaction.
Immobilised enzymes can be washed and re-used. The beads are all relatively the same size so that there is less chance of error on the investigation. Immobilised enzymes are also more stable in extremes of temperature and pH, which it will need for my experiment.
A buffer solution is one, which resists changes in pH when small quantities of an acid or an alkali are added to it.
An acidic buffer solution is simply one that has a pH less than 7. Acidic buffer solutions are commonly made from a weak acid and one of its salts - often a sodium salt.
A common example would be a mixture of ethanoic acid and sodium ethanoate in solution. In this case, if the solution contained equal molar concentrations of both the acid and the salt, it would have a pH of 4.76. It wouldn't matter what the concentrations were, as long as they were the same.
You can change the pH of the buffer solution by changing the ratio of acid to salt, or by choosing a different acid and one of its salts.
An alkaline buffer solution has a pH greater than 7. Alkaline buffer solutions are commonly made from a weak base and one of its salts.
A frequently used example is a mixture of ammonia solution and ammonium chloride solution. If these were mixed in equal molar proportions, the solution would have a pH of 9.25. Again, it doesn't matter what concentrations you choose as long as they are the same.
A buffer solution has to contain things that will remove any hydrogen ions or hydroxide ions that you might add to it because otherwise the pH will change. Acidic and alkaline buffer solutions achieve this in different ways.
I will be adding a pre-made buffer solution of a precise acidity or alkaline strength to each test-tube.
Independent Variable: In the investigation I am going to be changing the pH levels, which is why it is called the independent variable, as it is the only changing variable. The pH will be changed using a range of buffer solutions, which is explained above in the background knowledge.
Dependant Variables: All the other variables have to be kept constant throughout so that the results from the changing independent variable can be accurately measured. As if the dependant variables temperature, enzyme concentration, substrate concentration etc change then this will cause irregularities in the results. So therefore the experiment would be inaccurate and not useful for the investigation. The dependant variables are explained and bulleted below:
-
Temperature should be kept constant. This is because an increase I temperature causes more collisions and an increase in rate of reaction. So if one test-tube result is measured at a different temperature to the others it will be irregular as it will be working faster if it has a higher temperature or slower if it was a lower temperature. So in my experiment I am going to use a water bath set to be at 30⁰, which is just off room temperature.
-
Enzyme (Catalase) and Substrate (Hydrogen Peroxide) amounts need to be kept constant. This is because if one test-tube had more enzymes (alginate yeast) and substrate it would have more active sites and a higher chance (probability) of collisions. So the rate of reaction would be faster and the results would be unfair and wrong. So it is important that the beads are as close to the same size as can be preventing irregularities. So syringes must be used and amounts must be accurately measured out. To keep the beads the same size they can be washed and reused so they all are the same size for each test-tube.
-
Time must be kept the same. The production of oxygen should be recorded for a certain amount of time. So I will use a stopwatch and measure every 30 seconds for a 120 seconds. The stopwatch should start immediately (as close to simultaneously as possible) as the bung is in place, which is into the test-tube. This will mean the rate of reaction will be carefully recorded given reliable results as possible.
Apparatus:
- Test-tube rack x2
- Test-tube x7
- Test-tube rubber bung
- Glass rod
- 5ml syringe x2
- Gas-measuring syringe
- Glass delivery tube
- Clamp
- 50ml Hydrogen Peroxide
- 50 Alginate yeast beads
- Buffer solution
- 30⁰-water bath with metal rack test-tube holder inside the water bath.
- Sieve
- Permanent marker
- Stopwatch
- 100ml - Distilled water
- Apron
- Results table prepared to write down results
- Safety goggles
- Sink and paper towels
- 1g sodium alginate
- 1g yeast
- 50ml beaker x2 for making beads and 3% calcium chloride
- 10ml syringe
- 3% calcium chloride
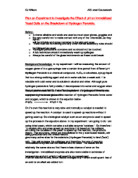
Diagram:
Method:
- Be in a science lab with all the correct apparatus.
- Put on all safety devices: goggles, apron and gloves.
- Make the alginate/yeast beads:
-
Add 0.8g of sodium alginate in 20 ml of H2O and stir with glass rod.
-
Add 1g of yeast in 20 ml of H2O and stir with glass rod.
- Mix the two solutions together in 50ml beaker.
- Leave for 5 minutes.
- Draw up 10ml of solution in s syringe.
- Clamp syringe 10cm off the work surface.
- Place a beaker of 3% calcium chloride beneath the syringe.
- Now apply constant pressure to the syringe so that the mixture forms sized alginate beads when dropped into calcium chloride.
- Enzyme has been trapped into beads
- Label each test-tube 1-7 using permanent marker pen.
- Turn the water bath up to 30⁰.
- Set up the apparatus:
- Attach gas-measuring syringe horizontally to the clamp so it is easy to read from.
- Place bung onto delivery tube end.
- Place delivery tube into the end of the gas-measuring tube.
- Place 50 alginate yeast beads into test-tube 1.
- Using ml syringe add 5mml of pre-made buffer solution with a pH of 1 into test-tube 1.
- Put test-tube into pre-heated water bath and leave for 5 minutes to make sure it gets to that temperature.
- Draw up 5ml of hydrogen peroxide into 5ml syringe.
- Be ready to put on the bung after injecting the hydrogen peroxide. Now rapidly inject the 5ml of hydrogen peroxide into the test-tube 1 and immediately place the bung on and start the stopwatch.
- On your results table using the stopwatch record the figure every 30 seconds for the amount of oxygen delivered into the gas-measuring syringe. Do this for 120 seconds (2 minutes) and then stop.
- Return gas syringe to 0 after removing the test-tube for the next measuring of test-tube 2.
- Using a sieve remove the 50 beads and wash them using distilled water.
- Once cleaned properly place beads into test-tube 2.
- Repeat procedure of test-tube 1 for test-tube 2 except with a buffer solution of pH 3.
- Keep repeating the procedure changing the pH of buffer solution by increasing it by 2 each time until u get to pH 13, which is the end.
- Repeat the experiment four times and work out an overall average of all 15 results for each pH 1, 3, 5, 7, 9, 11, and 13.
- Then put these results into suitable graphs.
Results Table: