First we must select Letters, and click next.
Step 3
The wizard will then take us to step 2. This gives us the option to either merge the open document (the bulk of the letter which will go home to the pupils parents) or create a new one. We must select ‘Use current document’ in order to successfully carry out this particular mail merge.
Step 4
We are then asked to select the recipients which we are going to send the letters to. Next, select Type new list, and click next.
A box will appear in Word; it is the address list, which looks like this –
Because we won’t need all the fields automatically selected by default by Word, we must customise the address list.
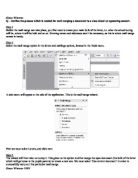
Step 5
When we click Customise, this box appears –
Highlight the fields we won’t be needing (Title, Company Name, Country, Phone Numbers, E-Mail addresses) and click remove. It will look like this…
We can now start entering our fields.
Step 6
Click OK, and we will get the chance to enter the details of a pupil who the letter will be sent to. It should look something like this –
To enter a new pupil, click New Entry. Repeat the process until all the pupils are entered into the address list. Then, click close, and save your address list. You then get an overview of the address book entries..
Make sure all the entries are selected, and click next.
Step 7
Next we will be asked to type our letter out, but seeing as though we have done this, we will skip to the next step. We can now select the recipients and preview where we want our field entries to go. We must click the box with the arrow underneath it in the diagram to select the fields.
Point the curser after the word ‘Dear’, then enter the First and last names of the pupil from the address box. The names will then appear beside the word ‘Dear’. You can preview each entry by clicking the arrow in the wizard box to the right of the document:
Once we are happy with where the field names are, we can then proceed to the final step of the merge.
Step 8
Click the ‘Complete Merge’ button. This will print off all the letters with the same content, apart from the first and last names will be edited with each of the pupil’s names. The merge is now complete.
To create envelopes with the pupils address on, follow the previous steps, apart from Step one – select envelopes instead of letters, and follow the same process.