The same theory of electrons colliding with atoms in a wire is used to explain the cause of resistance scientifically. In metal conductors, the current is carried by free moving electrons. Electric current will only travel if there are charges, which can move freely. Metals contain a sea of free moving electrons which are all negatively charged and which flow throughout a metal. This is what allows electric current to flow so well in all metals. The more energy the electrons have, the faster they will move as they have more energy. The higher the current, the more electrons will flow.
However, because they have more energy they are moving faster and therefore they will collide more with the atoms. These collisions create more resistance. Resistance is caused when the free moving electrons and atoms are flowing through a conductor like a metal wire. As the free moving electrons flow, they repeatedly bump into the atoms slowing them down. These collisions create heat. Every time, an electron collides with an atom, the electrons lose the energy, which is passed to the atom. As the atom gain more energy, is vibrates. The more energy it has, the faster it vibrates. When the atoms vibrate faster, the movement creates heat energy.
This is why the when you increase the voltage, the electrons will flow through the conductor faster and therefore more current will flow, which means more electrons will flow. If more electrons are flowing then more collisions will occur creating a higher resistance, which is slowing down the flow of the electrons, which therefore reduces current. This is why if you increase the resistance less current will flow.
By increasing the length of the conductor, which the electrons in the current have to flow across, you are increasing the amount of atoms, which are present, and therefore increasing the amount of collisions that will occur, increasing the resistance. So if you double the length of wire a current is flowing through, you will double the resistance that occurs.
PREDICTION
In this investigation, I am measuring the resistance compared to the length of the wire the current has to travel across. From my background knowledge I know that resistance is caused when the free moving electrons that carry the charge in a metal conductor (like a wire), collide with atoms also in the metal conductor. When they collide the electrons lose the energy, which they are carrying and the atoms gain it. As the atoms gain the energy they vibrate. This vibration creates heat, which is a product of resistance. As we increase the length of the wire in this investigation, I know that we will be increasing the amount of fixed atoms in the wire and therefore the free moving electrons carrying the electrical energy will collide more with them. As they collide they will lose their energy, and pass it on to the atoms. With more collisions they will lose more energy, and the atoms will gain more energy. As they gain this energy, they will vibrate creating more heat. Because more collisions will occur and more energy is being lost, the resistance will have increased. As we increase the voltage, the free moving electrons will move faster through the wire as the increase in voltage is pushing the electrons through the conductor faster. This increases the current. However, as the current is increased, there will be more free moving electrons carrying energy, so more collisions will occur as there is less space in the conductor for the electrons to pass through without hitting any atoms. So, I predict that the resistance of the wire will increase as the length of the wire increases.
SAFETY
I will:
Make sure I don’t overheat the wire because it will become very hot and snap.
Make sure all long hair must be tied back and surfaces must be checked for water because it is a good conductor of electricity.
Make sure the mains switch must be turned off before dismantling equipment to prevent shock.
VARIABLES
I have produced this plan, as this will make it a fair experiment. Each time I perform the experiment, I will make sure that I will do everything in the table.
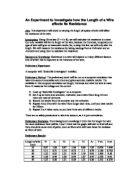
I will the measure the current and voltage with the nichrome wire at 20cm and then increasing every 20cms to 100cm.
DIAGRAM
APPARATUS
- 1 Power Pack
- 4 Wires
- 100cm nichrome wire
- 2 Crocodile Clips
- Voltmeter (0-5V) (Low range for more accuracy)
- Ammeter (0-2A) (Low range for more accuracy)
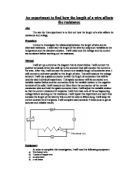
METHOD
1) Attach 1 wire to the power pack and to the ammeter, connect another from the ammeter to the wire on the board.
2) Attach 1 wire from the power pack to the voltmeter. Connect another wire from the voltmeter and (using a crocodile clip) connect onto the nichrome wire at 20cm.
3) Take a reading from the ammeter and the voltmeter at 20cm, then move to 40cm and take the two readings.
4) Move the clip and take readings at 20cm, 40cm, 60cm, 80cm and 100cm. Repeat each distance twice to get an average set of results. To find the resistance use the equation:
RESISTANCE (Ω) = PD across conductor (V)
Current through conductor (I)
5) Find the average set of results and record them into a table.
6) Use the lowest range ammeter and voltmeter as these produce more accurate results.
7) Measure each value of resistance to 2 decimal places for more accuracy.
TABLE OF RESULTS
Two Volts from power pack
Four volts from the power pack
Six Volts from power pack
CONCLUSION
From the graph and the result table I can conclude that as the length of wire increases, the resistance increases.
To find the resistance I used the equation:
RESISTANCE (Ω) = PD across conductor (V)
Current through conductor (I).
An example of using this equation was when I calculated the resistance for 40.00cm of wire at 2 volts from the power pack. First I collected the value, which I need to input into the equation. The PD across the conductor was 0.69 and the current through the conductor was 0.19. I then placed these values in the equation and worked out what the resistance is.
RESISTANCE (Ω) = 0.69
0.19
RESISTANCE (Ω) = 3.63
The resistance for 40.00cm of wire is 3.63Ω. I gave this figure to 2d.p as this gives more accuracy. I then repeated this process for all my results.
I predicted that as the length of wire increased, the resistance increased. This is what happened in the experiment. The longer length of wire we used the higher the resistance was. This proves my prediction was correct. I noticed that at 60.00cm length of wire and the power pack at two volts, the resistance was 4.18Ω. While at 100.00cm length of wire the average resistance was 5Ω. These values show that resistance definitely increased. The same thing happened when the power pack was set to four volts and six volts. This result was also shown clearly on my graph. My graph show that as the length of the wire was increased, the resistance also increased. The line of best fit represents this increase.
As we increase the length of the wire in this investigation, we increased the amount of fixed atoms in the wire and therefore the free moving electrons carrying the charged current collided more. As they collide they lost some of their energy, and pass it on to the atoms into which they collided with. With an overall increase in collisions the free moving electrons carrying the current overall lost more energy, which was transferred and gained by the atoms. As they gain this energy, they vibrate creating more heat. Because more collisions were occurring and more energy is was lost, the resistance increased. As we increased the voltage, the free moving electrons moved faster through the wire as the increase in voltage pushed the electrons through the conductor faster. This increased the current. However, as the current was increased, there were more free moving electrons carrying energy, so more collisions occurred as there is less space in the conductor for the electrons to pass through without hitting any atoms and losing parts of their current charge. This scientific knowledge along with my results from this experiment proves that as the length of a wire is increased, the resistance is increased.
EVALUATION
My procedure for this experiment was pretty successful. We followed the plan closely and accurately and avoided making any changes to it. The accuracy of our investigation could be reflected in the set of results we collected as there is only one odd result. Also the graph does not show perfect correlation compared to the line of best fit. This shows the results are not a set of perfect and accurate values.
To help make the results more accurate we could collect results for more lengths of wire. Another way in which we made our experiment more accurate was that we repeat the experiment and take an average set of results from them. This means that any odd results would be lost after averaging them out.
However, to help collect accurate results during the investigation, we uses low range voltmeters and ammeters, as they produced more accurate and precise results. Also measuring all the results to 2 decimal places also made the results more accurate.
Inaccuracies to our results could have been caused when clipping the crocodile clip onto the length of wire on the board. If we have misjudged a measurement slightly the value for that length of wire could have been inaccurate as the resistance through that distance could have been increased or decreased. Inaccuracies could also have been caused by an inaccurate supply of power into the circuit we were measuring resistance on.
If we were to do this experiment again, I would increase the number of results we collected. Instead of collecting 5 results and choosing lengths in distances of twenty we could record smaller intervals of length like every 5cm. This would make our graph more accurate as it would have more points plotted on it. Further procedures like repeating the experiment for a third or even fourth time could improve the accuracy of the results as well.