The temperature (heat):
This needs to be considered because the temperature would cause atoms in the wire to vibrate. With the atoms vibrating the resistance would be increased. Vice versa, if the experiment were to be conducted with a low temperature, the atoms would then form bonds with each other. Either way the temperature affects the resistance.
The material of the wire:
This is important because all materials have different properties and structures. Some materials will naturally have atoms compacted tightly together and this would cause the resistance to become greater. Therefore it is essential we use the same material each time, as it will have the same properties and make the experiment unbiased.
The thickness of the wire:
This must be considered a variable because the amount of atoms there is in the wire, depends on the thickness of the wire. There is less resistance in thicker wires, as it will hold more space for the current to travel through. Therefore the resistance will not be as large. This also tells us that even if we use the same material each times, it must be of the thickness each time as well.
The length of the wire:
This is a variable because the longer the piece of wire is, the resistance it can withhold and vice versa. The length of the wire is the most important variable and will therefore be the factor altered throughout the experiment.
Prediction
My prediction for this experiment is as the length of wire is increased, the resistance within the wire will increase also. I think that this will occur because
the wire is made up of a number of atoms. When electricity flows through the wire the current crashes into the particles. Each time the electrons in the electricity crash into the particles, energy is transferred into the wire. The more wire used, the greater the number of particles and therefore create a greater amount of resistance. It is process I predict to take place throughout this experiment.
Apparatus
Ammeter Wire
Voltmeter Scissors
Meter rule Power pack
A calculator Crocodile Clips
Method
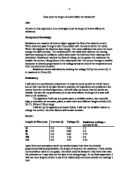
Firstly all the necessary equipment will be collected and set up as seen in the apparatus. Using a metre rule, 15cm of the wire will be measured and that amount shall be cut from the wire. It will be fixed into the circuit using crocodile clips. The power pack, set at 2V will be switched on and the voltage and current will be recorded. This will be repeated 3 times to keep the experiment fair. Then 30cm will be cut out of the same piece of wire and the same 3 experiments will be repeated. This will continue until 7 different sets of 3 results have been recorded. From these results the average of each current will be calculated and then the resistance can then be calculated. The formula for resistance is above.
To make the experiment unbiased the persons carrying out the experiment will try to be as unbiased as possible, in order to get the best and most accurate results possible. Therefore the same person will measure the length of the wire, for each section of he experiment. Both persons will take a calculation and either an average or an agreement will be the final result recorded. For example, if one person calculated 16.8 and the other calculated 16.6, an agreement of 16.7 will be taken. Three experiments for each length will be carried out and the voltage will be kept the same. The length of the wire will be kept to a bare minimum, as if the resistance causes the heat to become too great, the experiment will become unfair. The same piece of wire will be used to ensure accuracy, as the thickness and the material of the wire will then always be the same as the one used in the previous experiments. The experiment shall not be carried out relatively near any water, as water is a good conductor of electricity. Also the experiment shall hopefully be carried out on a wooden surface, as wood is an insulator of electricity. An insulator is something that electricity is unable to travel through.
This experiment will be carried out in the safest possible way. The necessary procedures will be taken if the persons involved feel it is appropriate. The scissors used will be placed in a safe position after use each time, to prevent any accidents. After the wire has been cut all excess pieces should hopefully be immediately placed into a dustbin to prevent someone from slipping or any accidents. All equipment used within the experiment will be placed safely onto the table, a reasonable distance from the edge, to ensure that it doesn’t fall off.
Results
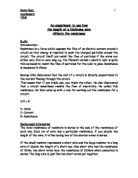
Evaluation of graph
The line on the graph is a line of best fit. This line almost perfectly goes through all the points that were plotted, in a straight line. That shows that the resistance is almost directly proportional to the resistance created. The line of best fit displays a positive correlation. The graph shows that the resistance steadily increases at the same rate that the length of the wire is increased.
Conclusion
In conclusion to this experiment, it went successfully. Considering the limited equipment and space they were available, the results were accurate and the experiment was as fair as possible.
The prediction was correct and this experiment proved that as you increase the length of a piece of wire, the resistance increases as well.
As this experiment was carried out successfully there is not a great deal of aspects, which would be altered. Each set of experiments per each length of wire could be carried out more. For example instead of only conducting each experiment 3 times with each piece of wire, 5 times may make the results even more accurate. Take the readings to larger decimal point, if the number is long enough. I would also if possible use an ohmmeter to record the resistance, because this would be more accurate and quicker than using the formula to work out the resistance.